Search for:
HDL – Loading Person Profile Items

In order to load person profile items, a person should have a profile code. There are two ways to create the profile code for a person record.

  1. From UI :- When any business user clicks on Talent Profile for a worker, a profile code is automatically generated in the backend. Profile code is not visible in UI and is always stored in the backend.
  2. Using HDL :- Profile codes can be loaded in bulk using TalentProfile.dat business object of HCM Data Loader (HDL).

It is advisable to load profile codes in bulk as part of data migration using HDL. But there are cases where a user will click on Talent Profile of a worker just after migrating the Core data for the worker. In this case, a profile code is generated in HRT_PROFILES_B table. So, when TalentProfile.dat is used, the profile record will fail for this particular worker.

Below SQL can be used to get list of all active workers who don’t have a talent profile code yet:

select * 
  from per_all_people_f papf
     , per_periods_of_service ppos
 where papf.person_id = ppos.person_id
   and trunc(sysdate) between papf.effective_start_date and papf.effective_end_date
   and ppos.actual_termination_date is NULL
   and not exists (select 1 from HRT_PROFILES_B hpb where papf.person_id = hpb.person_id )
BIP – Query to extract adjustment reasons attached on accrual Plan level

You can attach multiple adjustment reasons on accrual plan level. You can create any new custom adjustment reasons and add them in a lookup – ANC_ABS_PLAN_OTHER_REASONS.

Once the reason is added in the lookup, you can navigate to Absence Plans.

You can choose the newly added lookup code under “Enteries and Balances” tab.

Once the reasons are added, you can run below SQL query to extract the reasons added to the plan:

SELECT aapft.name
      ,aapf.legislation_code
      ,aapf.other_reasons
  FROM ANC_ABSENCE_PLANS_F aapf
      ,ANC_ABSENCE_PLANS_F_TL aapft
 WHERE aapf.absence_plan_id = aapft.absence_plan_id
   AND aapft.language = 'US'
   AND TRUNC(SYSDATE) BETWEEN aapf.effective_start_date AND aapf.effective_end_date
   AND TRUNC(SYSDATE) BETWEEN aapft.effective_start_date AND aapft.effective_end_date
   AND aapf.other_reasons IS NOT NULL
   AND aapf.other_reasons LIKE '%XX_MLA%'
ORDER BY 2,1  
Configuration – Using UNION in a value set

For requirements to add List of values to a DFF segments, one can create independent value set or a table based value set. For example, if you want LOV as your existing departments, then you can use a table based value set.

But sometimes, you need to display one hard coded value “All” along with list of departments. This is in order to specify that all departments are applicable for a DFF segement value.

In, this case you need to use UNION.

Below is how the query will look like:

SELECT substr(pd.name,1,125) dep_name
  FROM per_departments pd
UNION
SELECT 'All Departments' dep_name
  FROM DUAL

Value Set setup:

From Clause:

(SELECT substr(pd.name,1,125) dep_name  FROM per_departments pd UNION SELECT ‘All Departments’ dep_name  FROM DUAL) a

Value Column Name:

a.dep_name

ID Column Name:

a.dep_name

Configuration – Employee Location on Location Details page

Starting 22A, Oracle introduced a new field called “Employee Location”.

https://www.oracle.com/webfolder/technetwork/tutorials/tutorial/cloud/r13/wn/ghr/releases/22A/22A-hr-wn.htm#F21144

Any locations for which the value of the field will be selected as “Yes”, will be only available to be used in Manage Employment screen. This is a great feature to segregate locations which can be used on employee assignments vs locations which are used as training centers/ supplier locations etc.

By default, this field is hidden on Location Details quick action.

One needs to enable a sandbox and then from transaction design studio, make it visible.

From Quick actions under My Client Groups, choose Location Details:

image.png

If you still don’t see the attribute, create a new sandbox, add Experience Design Tool in it:

Choose Location Details as Action:

image.png

Click on Add,

under Page attributes, you see Employee Location is hidden OOTB:

image.png

P.S. – Please note this field can’t be used in classic locations page. Also, the default value is set to No.

BIP – Approval Task Name in Transaction Console vs Task name in BPM

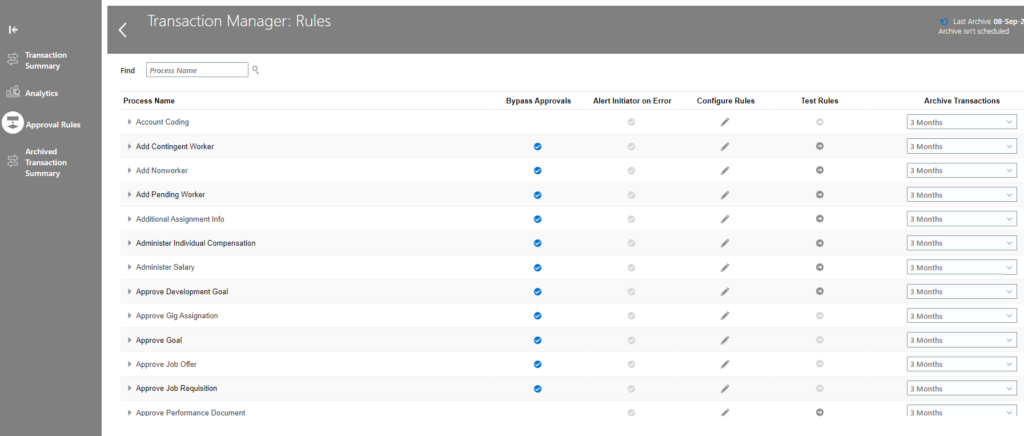
In HCM, you can define approval rules for different HCM tasks from Tools -> Transaction Console -> Approval Rules

For example, you want to define an approval rule for Promote action. You can search Promo% in Find box and it will give you all matching approval rules:

You can then click on ‘Configure Rules’ to define the rules.

However, Transaction console has many limitations. You can’t define complex approval rules. You can’t make use of functions etc (Day between) in transaction console. In order to define more complex rules, you need to do it from BPM.

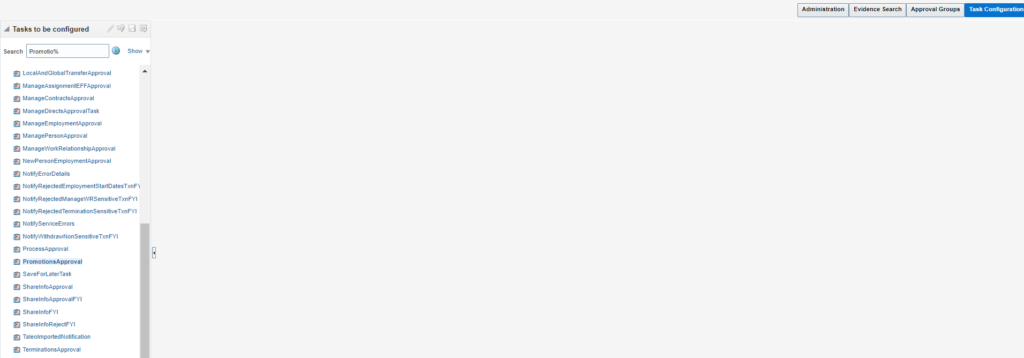
First step is that you need to search for a task from “Task Configuration”:

The issue here is sometimes the Approval Rule names in Transaction Console doesn’t match with Task names in BPM.

In such case, you can make sure of below Query:

SELECT HAPT.NAME "Approval Rule Name"
      ,HAPT.DESCRIPTION
      ,HRPB.TASK_FILE_NAME TaskName
      ,HRPB.TXN_MODULE_IDENTIFIER
      ,HAPT.CATEGORY_NAME
      ,HRPB.CATEGORY_CODE
      ,HAPT.SUBCATEGORY_NAME
      ,HRPB.SUBCATEGORY_CODE
      ,HRPB.FAMILY
      ,DECODE(HAAO.APPROVAL_DISABLED,'true','Bypassed','false','Enabled') "Enabled Status"
 FROM FUSION.HRC_ARM_PROCESS_B HRPB
     ,FUSION.HRC_ARM_PROCESS_TL HAPT
     ,FUSION.HRC_ARM_APPROVAL_OPTIONS HAAO
WHERE HRPB.PROCESS_ID=HAAO.PROCESS_ID
  AND HRPB.PROCESS_ID=HAPT.PROCESS_ID
  AND HAPT.LANGUAGE = 'US'
  AND HRPB.FAMILY = 'HCM'
 ORDER BY 1  

Result:

BIP – Query to find size of documents attached in DOR

Oracle HCM provides a functionality to store different kinds of worker documents in Document Records. Over a period of time, a large number of documents get accumulated for different workers. In such cases, there are requirements to know size of attachments in DORs. For, this I have developed a simple query which can be modified as needed:

select fdv.file_name
      ,fdv.title
      ,dm_document_id
      ,TRUNC(SUM(wcc_documents.dFileSize)/1024,2) 			as "Size in KB"
      ,TRUNC(SUM(wcc_documents.dFileSize)/1024/1024,2) 		as "Size in MB"
      ,TRUNC(SUM(wcc_documents.dFileSize)/1024/1024/1024,2) as "Size in GB"
 from hr_documents_of_record hdr, 
      fnd_attached_documents fad, 
      fnd_documents_vl fdv,
      fusion_ocserver11g.revisions wcc_revisions,  
      fusion_ocserver11g.documents wcc_documents
where to_char(hdr.documents_of_record_id) = fad.pk1_value(+)
  and fad.entity_name(+) = 'HR_DOCUMENTS_OF_RECORD'
  and fad.document_id = fdv.document_id(+)
  and fdv.dm_version_number = wcc_revisions.did
  and wcc_revisions.did = wcc_documents.did
  and wcc_documents.disprimary = 1
group by fdv.file_name
        ,fdv.title
	,dm_document_id	
order by 1 
Configuration – Conditional Name Formatting

There are requirements where customers want to display Honors in “Display Name” if First Name is blank. This where the conditional name formatting functionality of Oracle HCM helps to achieve desired results.

Let us assume, we want display name in below format:

NVL(First Name, Honors), Name Information 1

Follow below steps to achieve this requirement:

  1. Search for Task “Manage Person Name Formats” from setup and maintenance:

2. Search the name format you want to modify/ or create a new one if you want to have a new name format:

3. Click on edit and Choose Conditional Name Formatting component:

4. Scroll down and supply the values in “Preview Name Format” section:

5. As can be seen, first name is blank so Formatted Name is displayed as – Honors Name_Information_1

6. If you supply a value for first name:

Formatted Name is displayed as – Test Name_Information_1 (Honors is ignored as First Name is present).

This is a new feature introduced in 21C.

https://www.oracle.com/webfolder/technetwork/tutorials/tutorial/cloud/r13/wn/ghr/releases/21C/21C-global-hr-wn.htm#F19019

Please make sure to run “Apply Name Formats to Person Names, Keywords and LDAP” job set from scheduled processes under Tools.

Configuration – Load Announcements file in content server

When creating a new announcement (Tools -> Announcements) , user has an option to upload images from local directory or a link can be given to a file uploaded in content server.

From local directory:

For content server link:

One needs to follow below steps in order to upload the image file to content server:

  1. Login into content server. Suffix your pod url with /cs:

https://pod.fa.oracle.com/cs

2. Do a new check-in:

3. Click on “Check In”

4. Once the file is successfully checked-in. Click on “New Folio” Under “Content Management”

5. Choose Simple Folio and Click on “Load Folio”:

6.

7. Under “Folio Elements”, click on Add:

Search for Content ID from step 3:

8. Click Next and Folio should be created:

9. Right Click on image and copy Image address.

Use that address in Annoucments.

Configuration – Modify existing system messages

Oracle HCM provides lots of pre-defined messages which are triggered/displayed in UI on various actions. For example, if you are trying to hire a new person on a position which doesn’t have the vacant FTE, system will throw below warning message:

However, in this particular scenario, business wanted to see an Error message instead of Warning. This can be achieved easily, using “Manage Messages” task under “Setup and Maintenance”.

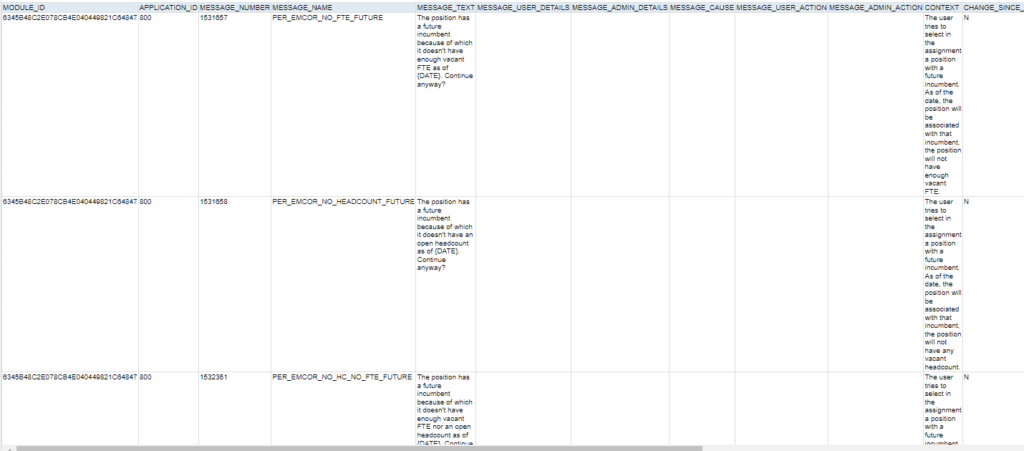
However, before using Manage messages task, one should know the message number or message name to search. The message name/ message number can be found by running a quick query on fnd_messages_vl:

select * from fnd_messages_vl
where upper(message_text) like 'THE%POSITION%HAS%FUTURE%INCU%'

This will return you the list of all messages which matches the given text:

One we are looking to modify is – 1532361/PER_EMCOR_NO_HC_NO_FTE_FUTURE.

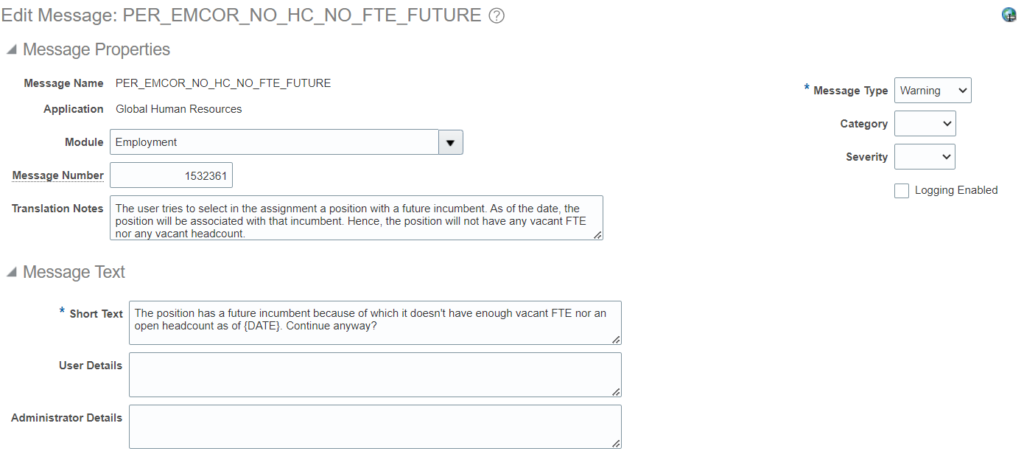
Note it down and open Manage Messages task. Enter the message number and click on search:

Click on edit icon to edit the message:

On edit screen, you can change message text as well as message type:

Change the type to Error and save the changes:

Please note that there are certain messages on UI which are not available in manage messages. To edit those messages, User Interface Text tool can be utilized:

BIP – Extract Document Record File Link from Content Server

Below query can be used to extract the document record from content server.

SELECT papf.person_number		"Person Number",
       ppnf.first_name			"First Name",
       ppnf.last_name			"Last Name",
       fdt.file_name 			"Attached File Name",
       fdt.dm_version_number 	"Document Id",
       fdt.dm_document_id 		"UCM Content Id",
       (SELECT 'https://'||external_virtual_host
          FROM fusion.ask_deployed_domains
         WHERE deployed_domain_name = 'FADomain')
	   ||'/cs/idcplg?IdcService=GET_FILE' 
	   || chr(38) 
	   || 'dID='
       || fdt.dm_version_number
       || '&dDocName='
       || fdt.dm_document_id
       || '&allowInterrupt=1' 	"UCM File Link"  
  FROM per_all_people_f papf,
       per_person_names_f ppnf,
       hr_documents_of_record hdor,
       fnd_attached_documents fad,
       fnd_documents_tl fdt
 WHERE 1=1
   AND hdor.person_id = papf.person_id
   AND papf.person_id = ppnf.person_id
   AND hdor.documents_of_record_id = fad.pk1_value
   AND fad.document_id = fdt.document_id
   AND fdt.language = 'US'
   AND fad.entity_name = 'HR_DOCUMENTS_OF_RECORD'
   AND ppnf.name_type = 'GLOBAL'
   AND trunc(sysdate) between papf.effective_start_date and papf.effective_end_date
   AND trunc(sysdate) between ppnf.effective_start_date and ppnf.effective_end_date
 ORDER BY 1
Configuration – Hiding Print Me under Settings and Actions

Settings and Actions under user name provides a lot of options. Sometimes, the users request to remove unwanted options from this list:

These options can be removed from this list by activating a sandbox and adding tool – “Page Template Composer”:

Once you activate the Sandbox, click on Edit Global Page Template option under “Settings and Actions” and click on Global Page Template:

Click on the option you want to hide (Print Me) in this case:

Click on Settings and uncheck the visible checkbox:

Once the changes are done and you are happy with the changes, publish the sandbox.

Configuration – Pull configured actions/action reasons

Below query can be used to pull actions and configured actions for these reasons along with action type:

SELECT pav.action_type_code
      ,pav.action_code
      ,pav.action_name
      ,parv.action_reason_code
      ,parv.action_reason
      ,to_char(aru.start_date, 'yyyy/mm/dd') start_date
      ,to_char(aru.end_date, 'yyyy/mm/dd') end_date
  FROM PER_ACTION_REASON_USAGES aru,
       PER_ACTIONS_VL pav,
       PER_ACTION_REASONS_VL parv
 WHERE 1=1
   AND aru.action_id = pav.action_id
   AND aru.action_reason_id = parv.action_reason_id
   AND pav.action_code = 'CHANGE_SALARY'
ORDER BY 1,3,5   
Fusion Diagnostics – Important MOS notes related to diagnostics

Below are some important my oracle support notes related to diagnostic framework:

Self-Service Data Integrity Framework for Employment Flows – Part 2 (Doc ID 2597759.1)
Self-Service Data Integrity Framework for Employment Flows – Part 1 (Doc ID 2548287.1)
Self-Service Data Integrity Framework for Person Flows (Doc ID 2548789.1)
Self-Service Data Integrity Framework for Workforce Structure Flows (Doc ID 2548827.1)
Fusion Global HR: Corruption Type in Person Diagnostic Auto Correct Report (Doc ID 2619978.1)

Check below link to see the privilege’s required for run Diagnostics:

Configuration – Update Legal Entity Name

There are requirements when the existing legal entity name should be updated to a new name. One should note that the LE name in UI is displayed for a view – HR_ALL_ORGANIZATION_UNITS_F_VL.

Sometimes, even after updating the name in UI, correct name is not reflected on some pages like Manage Employment or Manage Legal Entity Information for HCM.

In such cases, one should verify the value in HR_ALL_ORGANIZATION_UNITS_F_VL view to make sure the updated value is showing here.

If updated value is not available in this view, please follow below steps:

  1. Search for legal entity from ‘Manage Legal Entity for HCM Information’ under My Client Groups -> Workforce Structures
  2. Open the legal entity -> Click on action and choose correct
  3. Submit the changes without doing any change.

This should force the name update to happen in HR_ALL_ORGANIZATION_UNITS_F_VL view.

BIP – How to check Termination version on your environment?

You can use per_empl_configurations table to verify the versions of Seniority dates/ Termination dates.

Below is an example to check the version for Termination dates:

select version_code 
  from fusion.per_empl_configurations 
 where configuration_type = 'ORA_TERMINATION'

If the version code value is NULL that means you are still on version V2.

Same table can be used to query Seniority Dates version.