Use below query to get absence attachment id of an absence from UCM:
SELECT papf.person_number
,type.name absence_type
,fdt.dm_document_id ucm_content_id
,fdt.file_name
,to_char(apae.start_date,'DD-Mon-RRRR', 'nls_date_language=American') absence_start_date
,to_char(apae.end_date,'DD-Mon-RRRR', 'nls_date_language=American') absence_end_date
,apae.source
FROM fnd_attached_documents fad
,fnd_documents_tl fdt
,anc_per_abs_entries apae
,anc_absence_types_vl type
,per_all_people_f papf
WHERE 1 = 1
AND fad.entity_name ='ANC_ATTACHMENT'
AND fad.pk1_value = apae.per_absence_entry_id
AND fdt.document_id = fad.document_id
AND fdt.language = userenv('LANG')
AND apae.absence_type_id = type.absence_type_id
--AND type.name = 'Sick Leave'
AND papf.person_id = apae.person_id
-- AND papf.person_number in (:PERSON_NUMBER)
AND trunc(SYSDATE) BETWEEN papf.effective_start_date AND papf.effective_end_date
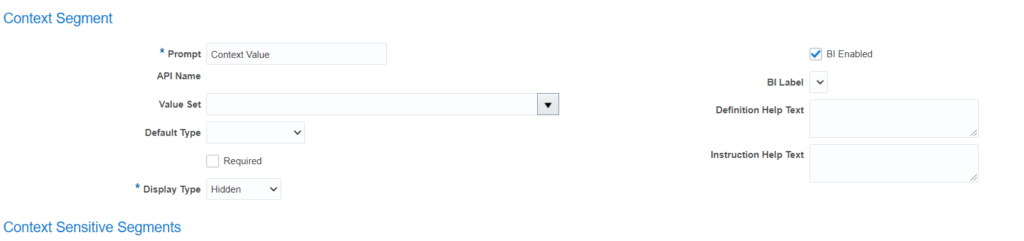
There is a common requirement to default the value of DFF attributes on a UI page. For example, we want to default a defined attribute of ‘PER_PERSONS_DFF’ DFF based on person_id. For this we will need to pass the parameter as :{parameter.parameter_name} in table validated value set. To know the list of all parameters supported for ‘PER_PERSONS_DFF’, we can utilize either of below mentioned methods:
From UI:
Navigate to Setup and Maintenance -> Search -> Manage Descriptive Flexfields-> PER_PERSONS_DFF -> Search
Click on edit icon and search for Derivation value field under ‘Context Segment’:
You don’t see any derivation value here which means ‘PER_PERSONS_DFF’ doesn’t support any parameters.
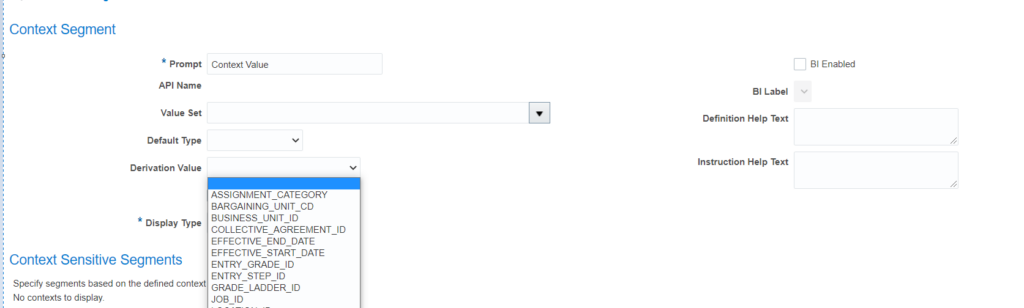
You can check the same for any other DFF and check the list of parameters. Below is a screen shot from ‘PER_POSITIONS_DFF’ dff which shows the supported parameter list.
2. From Backend:
Run the below SQL from reports and analytics and verify the results:
select * from FND_DF_PARAMETERS where DESCRIPTIVE_FLEXFIELD_CODE = ‘PER_POSITIONS_DFF’
There is a common requirement to implement Single Sign On (SSO) with fusion HCM.
First, let’s try to understand some basic concepts of SSO:
IDP – Identity provider : The identity provider verifies the user credentials and sends the authorization and authentication response back to the service provider. For example, Microsoft AD.
SP – Service Provide : Oracle Application Cloud (Fusion HCM) which is setup as a service provider, sends a verification request to the user’s identity provider.
Users will be registered with identity providers i.e. Microsoft AD in this case who store and manage identity and credentials. In Security Console, we can add those identity providers so that we can verify those users .
Oracle Applications Cloud, which is set up as a service provider, sends a verification request to the user’s identity provider who’s already added to the Security Console.
The identity provider verifies the user credentials and sends the authorization and authentication response back to the service provider.
After successful authentication, users are granted access to the required application or web page.
Configuration Steps with Microsoft AD:
To configure Oracle Applications Cloud as the service provider, you must do the following in Oracle Cloud and some steps in Microsoft AD:
1) Microsoft AD – In Azure AD, download the Azure AD SAML metadata document.
2) Oracle Applications – Add an identity provider , upload the metadata document provided by IDP is Step 1
3) Oracle Applications – Download the federation metadata document.
4) Microsoft AD – Upload the federation metadata document provided by oracle in Step 3 .
Technical consultants encounter many scenario’s where they have to update one or two attributes on the assignment data post initial data load. This can happen during any phase of the new implementation or post go-live. For example, there is a need to update the assignment category for a set of workers. In such scenario’s, the approach is to extract the already uploaded assignment data with minimum required attributes and append the attributes for assignment category and upload it back to Fusion using HDL.
The key thing here is to extract the minimum required data for Assignment and WorkTerms. The mandatory fields required for an update using HDL can be checked from:
My Client Groups -> Data Exchange -> View Business Objects -> Worker -> WorkTerms -> Assignment
Validated Version :- 20D
Sample Query to extract the minimum required attributes for Assignments and Workterms in order to update assignment category (AssignmentCategory):
Below query can be used to extract disability details of a worker:
SELECT papf.person_id
,papf.person_number
,ppnf.full_name
,to_char(pdf.effective_start_date,'DD-Mon-RRRR', 'nls_date_language=American') dis_eff_st_dt
,to_char(pdf.effective_end_date,'DD-Mon-RRRR', 'nls_date_language=American') dis_eff_end_dt
,pdf.legislation_code
,pdf.disability_code
,(select pou.name from per_organization_units pou
where pou.organization_id = pdf.organization_id) disability_org_name
,to_char(pdf.registration_date,'DD-Mon-RRRR', 'nls_date_language=American') dis_registration_date
,to_char(pdf.registration_exp_date,'DD-Mon-RRRR', 'nls_date_language=American') dis_registration_exp_date
,to_char(pdf.assessment_due_date,'DD-Mon-RRRR', 'nls_date_language=American') dis_assessment_due_date
,pdf.category
,pdf.description
,pdf.degree
,pdf.quota_fte
,pdf.reason
FROM PER_DISABILITIES_F pdf
,PER_ALL_PEOPLE_F papf
,PER_PERSON_NAMES_F ppnf
WHERE papf.person_id = pdf.person_id
AND ppnf.person_id = papf.person_id
AND ppnf.name_type = 'GLOBAL'
AND TRUNC(SYSDATE) BETWEEN papf.effective_start_date AND papf.effective_end_date
AND TRUNC(SYSDATE) BETWEEN ppnf.effective_start_date AND ppnf.effective_end_date
Use the below query to extract assigned payroll details from Fusion HCM:
SELECT papf.person_id
	  ,papf.person_number
	  ,ppnf.full_name
	  ,papd.payroll_id
	  ,papf_pay.payroll_name
	  ,prrd.payroll_relationship_number
	  ,to_char(prrd.start_date,'DD-Mon-RRRR', 'nls_date_language=American') payroll_rel_start_date
	  ,to_char(prrd.end_date,'DD-Mon-RRRR', 'nls_date_language=American') payroll_rel_end_date
	  ,to_char(papd.FSED,'DD-Mon-RRRR', 'nls_date_language=American') fsed
	  ,to_char(papd.FINC,'DD-Mon-RRRR', 'nls_date_language=American') finc
	  ,to_char(papd.LSPD,'DD-Mon-RRRR', 'nls_date_language=American') lspd
	  ,to_char(papd.LSED,'DD-Mon-RRRR', 'nls_date_language=American') lsed
	  ,paam.assignment_number
	  ,prgf.time_card_req
  FROM pay_assigned_payrolls_dn papd
	  ,pay_payroll_terms ppt
	  ,pay_pay_relationships_dn prrd
	  ,pay_all_payrolls_f papf_pay
	  ,pay_rel_groups_dn prgd
	  ,pay_rel_groups_f prgf
	  ,per_all_people_f papf
	  ,per_person_names_f ppnf
	  ,per_all_assignments_m paam
 WHERE papd.payroll_term_id = ppt.payroll_term_id
   AND ppt.payroll_relationship_id = prrd.payroll_relationship_id
   AND papd.payroll_id = papf_pay.payroll_id
   AND prrd.person_id = papf.person_id
   AND prrd.payroll_relationship_id = prgd.payroll_relationship_id
   AND prgd.relationship_group_id = prgf.relationship_group_id
   AND prgd.assignment_id = paam.assignment_id
   AND paam.effective_latest_change = 'Y'
   AND prgd.group_type = 'A'
   AND ppnf.person_id = papf.person_id
   AND ppnf.name_type = 'GLOBAL'
   AND TRUNC(SYSDATE) BETWEEN papf.effective_start_date AND papf.effective_end_date
   AND TRUNC(SYSDATE) BETWEEN ppnf.effective_start_date AND ppnf.effective_end_date
   AND TRUNC(SYSDATE) BETWEEN prgf.effective_start_date AND prgf.effective_end_date
   AND TRUNC(SYSDATE) BETWEEN paam.effective_start_date AND paam.effective_end_date
   AND papf.person_number = '11111'
 ORDER BY 2,3
Sometimes while loading the worker assignments or assigning an employee to a new position, you get “The Selected Position Has No Open headcount. Select A Different Position To Continue” error, one resolution to this is to disable the Position Incumbent Validation at enterprise level.
Follow the below steps to disable the position validation:
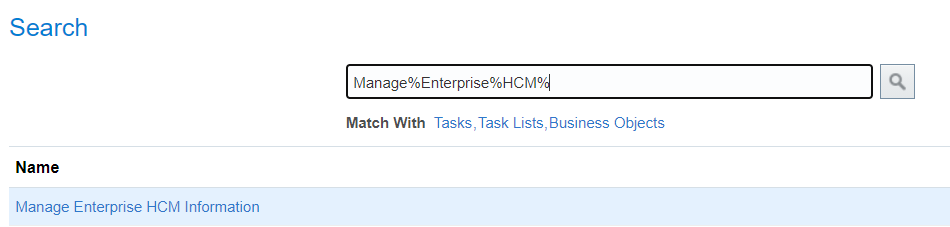
Navigate to Setup and Maintenance -> Search -> Manage Enterprise HCM Information:
2. Search for Position Incumbent Validation on Enterprise screen. If not found, then follow the steps 3 – 8, else move directly to step 9.
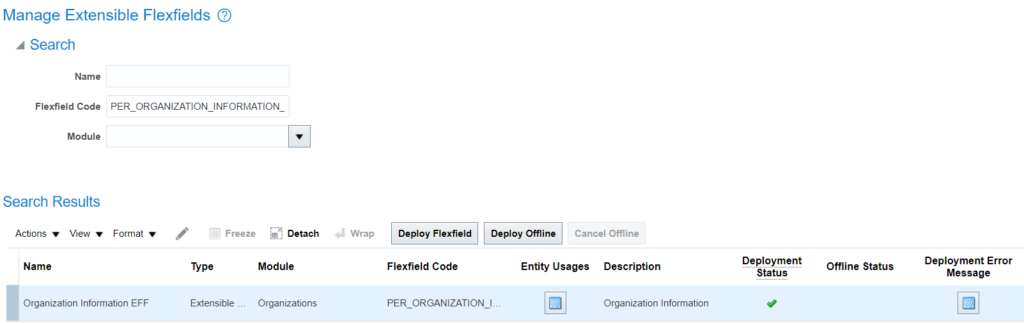
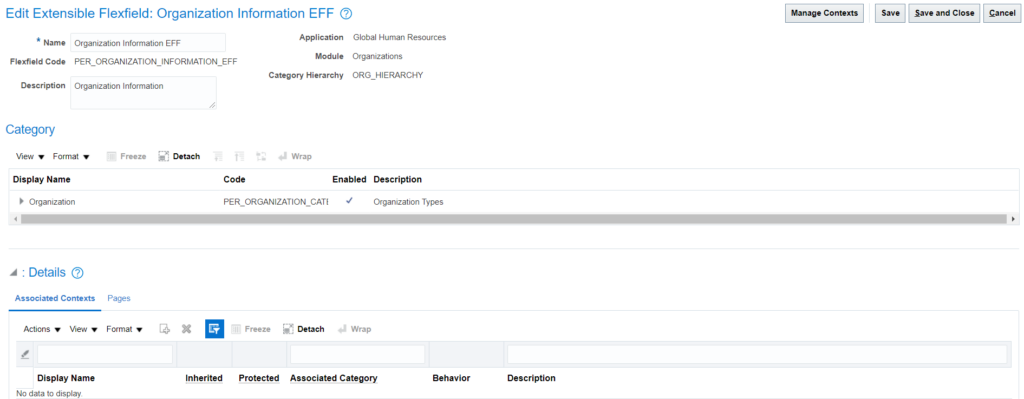
3. If Position Incumbent Validation is not available on enterprise screen, search for ‘Manage Extensible Flexfields’ and search for ‘PER_ORGANIZATION_INFORMATION_EFF’:
4. Click on edit icon:
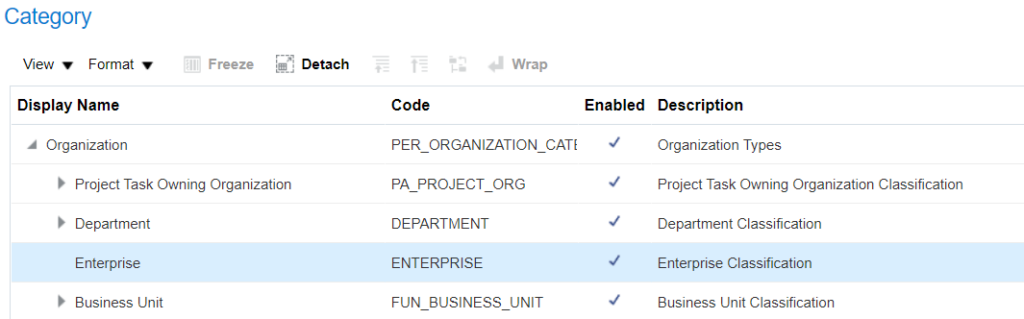
5. Under Category, expand Category and choose Enterprise and scroll down:
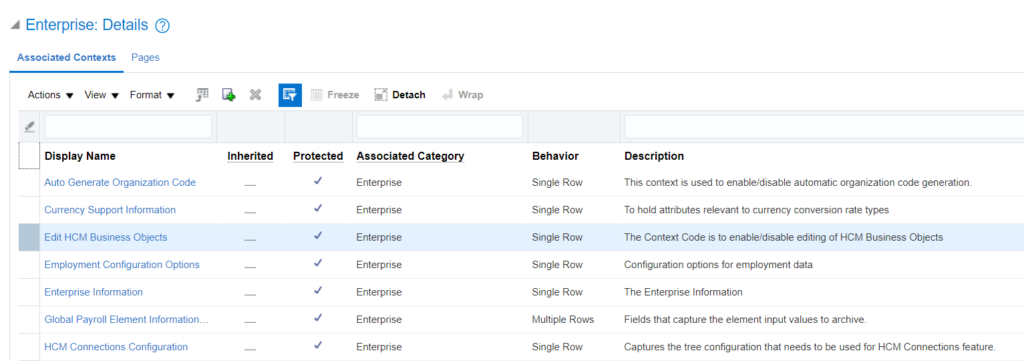
6. Click on Pages under ‘Enterprise Details’:
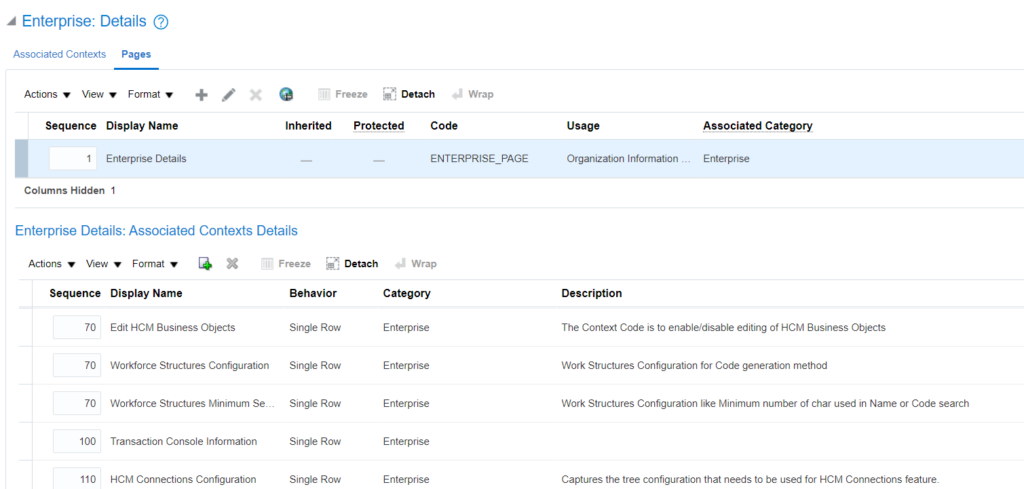
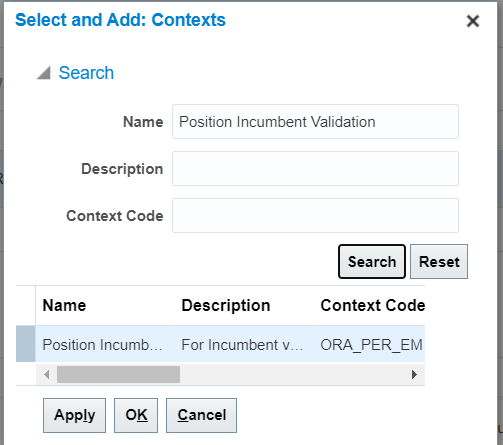
7. Click on add icon under ‘Enterprise Details: Associated Context Details’ and select & add ‘Position Incumbent Validation’ context:
8. A new context will be added:
Click on Save and Close and Deploy the flexfield.
9. On successful deployment of flexfield, go back to ‘Manage Enterprise HCM Information’ task and search for ‘Position Incumbent Validation’:
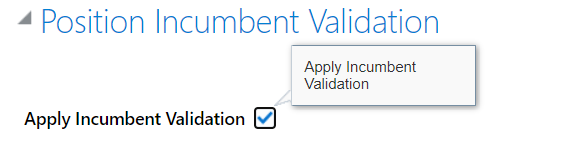
10. Click on Edit button in Correction mode and check the checkbox and save the record:
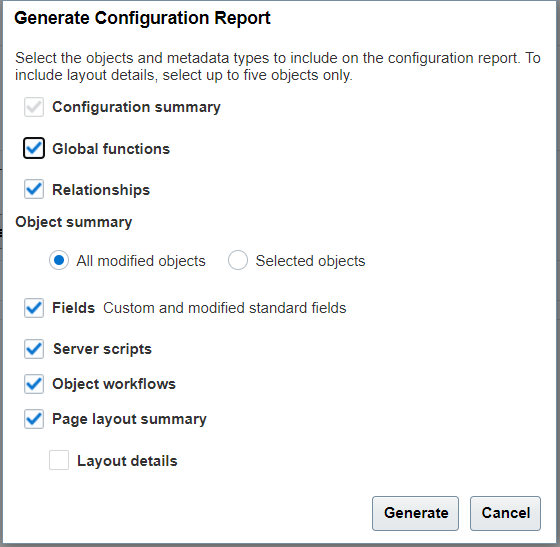
In HR Helpdesk module, generally a lot of customizations are done i.e. adding a new field on standard screen, new triggers etc. Once the solution is finalized, a report can be generated which will list down all the customizations. This is an Out of the box functionality provided by Fusion applications.
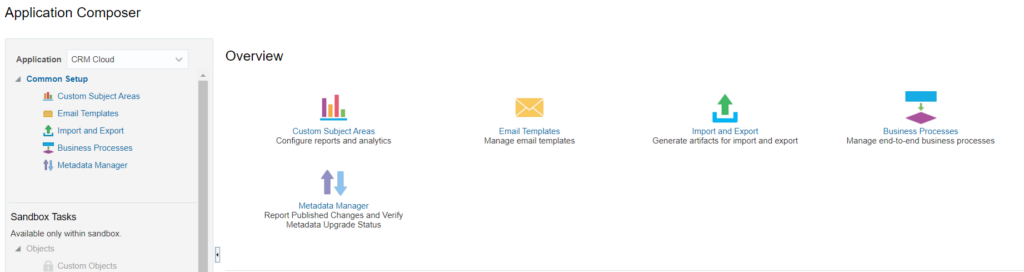
Navigate to Home -> Configuration -> Application Composer -> Metadata Manager
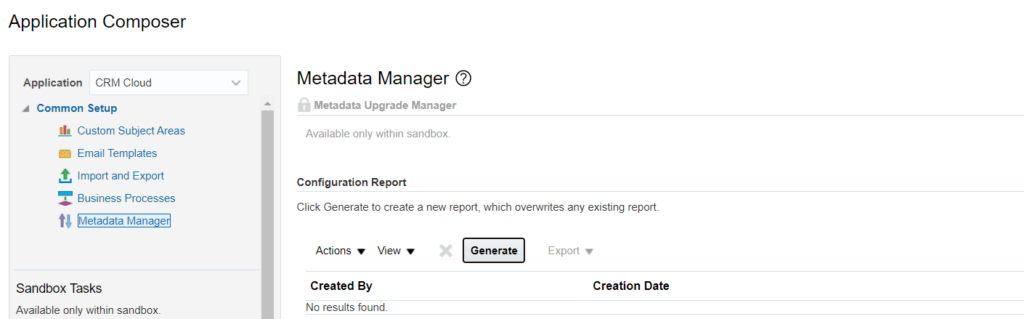
Click on generate button:
Choose the objects and Metadata types to be included in report:
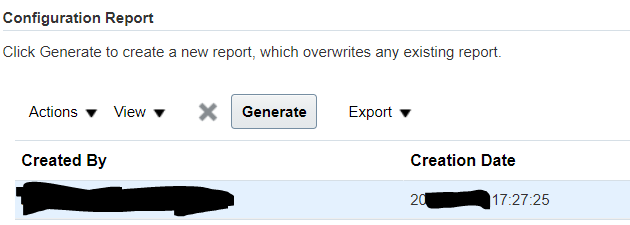
Click on generate button and wait while the configuration report is getting generated.
Once the report is generated, click on Export to generate the report in excel or HTML format.
Below is the sample HDL to load the GL Costing information at department level using Organization.dat file. It is always advisable to get the latest METADATA attributes. Check the below link to see the process of Refreshing the HDL objects:
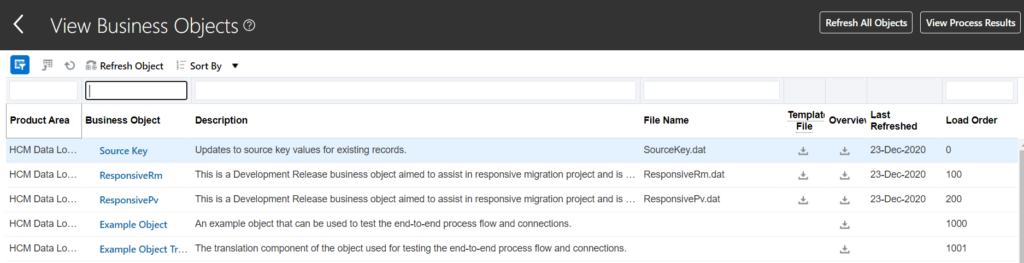
Refresh Business objects is a process which is used to create the HDL template for a business object with the latest supported attributes.
When to run ‘Refresh Business Objects’ process:
It is advised to run this process:
After every upgrade
After any new DFF/EFF attributes are configured for any HDL supported business objects.
How to run‘Refresh Business Objects’ process:
To run ‘Refresh Business Objects’ process, navigate to My Client Groups -> Data Exchange -> View Business Objects
On the View Business Objects UI, you will see 2 buttons:
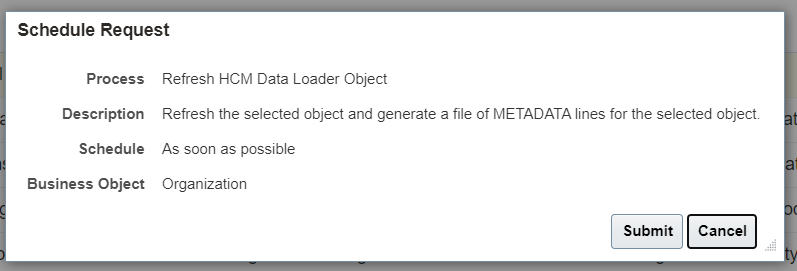
a. Refresh Object – This is used when you want to refresh only one object at a time. This is usually run when any new DFF attributes are setup for a particular object. Once you click on ‘Refresh Object’, you will see the below screen:
Click on Submit button to submit the process.
You can then click on ‘View Process Results’ button to check the progress:
Once the process completes, you can see the last refreshed date:
b. Refresh All Objects – This is used when you want to refresh all the business objects. This is usually run post release upgrade.
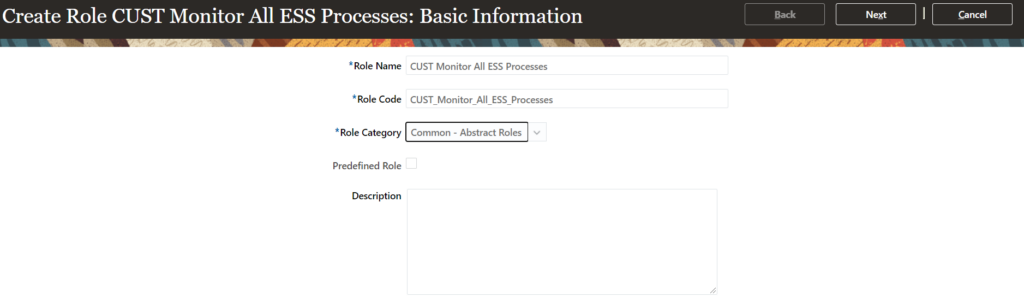
As per the standard Fusion security, a user can view only the scheduled processes which has been scheduled from his/her user login. However, there is a common requirement where the admin should be able to view all the scheduled processes (processes scheduled by all the users). This can be achieved by creating a custom role. Follow the below mentioned steps to create the Role:
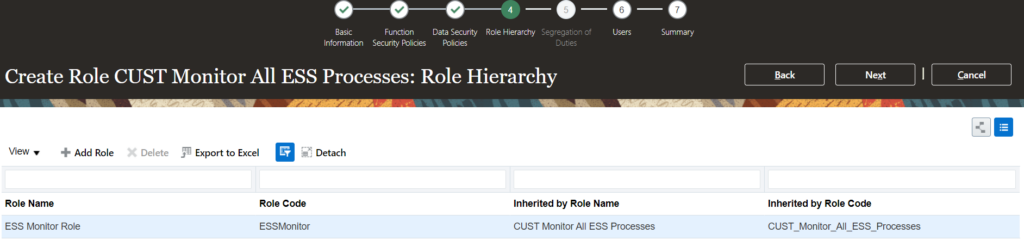
Navigate to Home -> Tools -> Security Console -> Create Role
2. Choose the category as ‘Abstract Data Role’
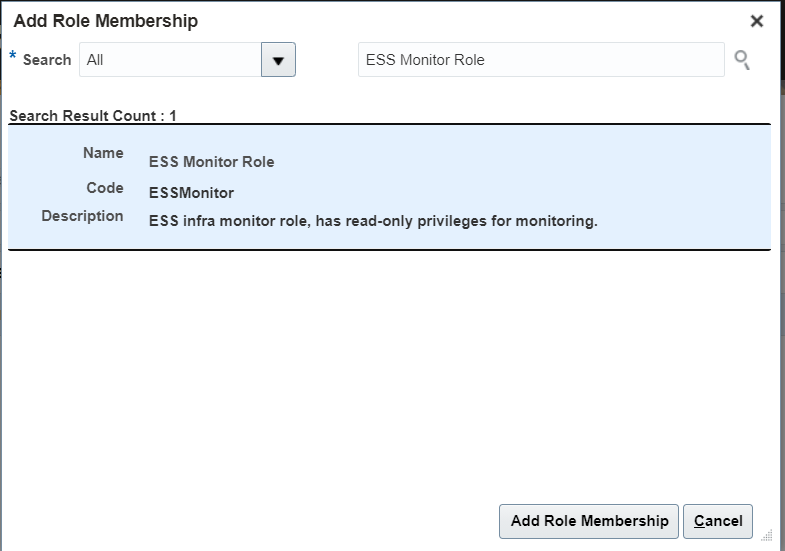
3. Click next and stop on ‘Role Hierarchy’ train stop. Click on Add button and search for ‘ESS Monitor Role’ and click on ‘Add Role Membership’:
4. Click Next and in ‘User’ train stop add the user to whom you want to assign this role. This is an optional step.
5. Click Next and Click on Save and Close.
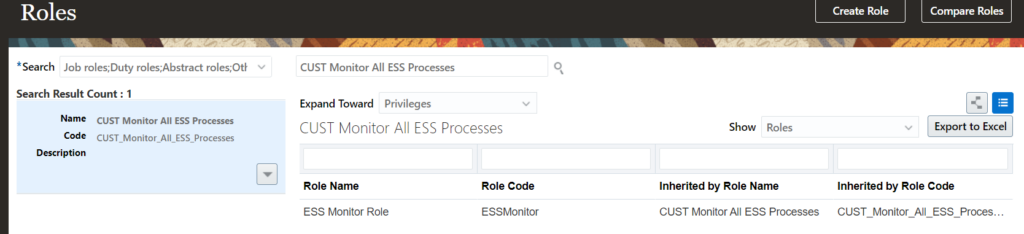
6. Search for the newly created role under ‘Roles’ tab:
7. Assign the role to required users.
8. Run the ESS process ‘Import User and Role Application Security Data’. Once the process is complete, login and logout and verify that the user is able to see all the ESS jobs under ‘Scheduled Processes’.
Post P2T refresh, it is mandatory to mask the actual email Ids of the users in cloned test environment. This is required to avoid any unwanted emails getting triggered to the end users.
Use the below SQL to extract the data in HDL format:
select 'MERGE' "METADATA",
       'PersonEmail' "PersonEmail",
       pea.email_address_id "EmailAddressId",
       pea.person_id "PersonId",
       to_char(pea.date_from,'RRRR/MM/DD') "DateFrom",
       to_char(pea.date_to,'RRRR/MM/DD') "DateTo",
       pea.email_type "EmailType",
       -->pea.email_address "1EmailAddress",
       replace(replace(pea.email_address,'@','@invalid'),'.co','.xco') "EmailAddress", --> Change the format as per your requirement
      (select email_hrc.source_system_id
         from hrc_integration_key_map email_hrc
        WHERE pea.email_Address_id = email_hrc.surrogate_id) "SourceSystemId",
      (select email_hrc.source_system_owner
         from hrc_integration_key_map email_hrc
        WHERE pea.email_Address_id = email_hrc.surrogate_id) "SourceSystemOwner"
  from per_email_addresses pea
 where 1=1
   and upper(email_address) like '%XXCOMPANY%' --> Change the format as per your requirement
Query with Person Number:
select 'MERGE' "METADATA",
       'PersonEmail' "PersonEmail",
       pea.email_address_id "EmailAddressId",
       pea.person_id "PersonId",
       papf.person_number "PersonNumber",
       to_char(pea.date_from,'RRRR/MM/DD') "DateFrom",
       to_char(pea.date_to,'RRRR/MM/DD') "DateTo",
       pea.email_type "EmailType",
       -->pea.email_address "1EmailAddress",
       replace(replace(pea.email_address,'@','@invalid'),'.co','.xco') "EmailAddress", --> Change the format as per your requirement
      (select email_hrc.source_system_id
         from hrc_integration_key_map email_hrc
        WHERE pea.email_Address_id = email_hrc.surrogate_id) "SourceSystemId",
      (select email_hrc.source_system_owner
         from hrc_integration_key_map email_hrc
        WHERE pea.email_Address_id = email_hrc.surrogate_id) "SourceSystemOwner"
  from per_email_addresses pea, per_all_people_f papf
 where 1=1
   and pea.person_id = papf.person_id
   and trunc(sysdate) between papf.effective_start_date and papf.effective_end_date
   and upper(email_address) like '%XXCOMPANY%' --> Change the format as per your requirement
Once the data is generated, create the HDL file and load the Worker.dat.
Post data load steps:
Run “Send Personal Data for Multiple Users to LDAP” process. This process will sync up the latest email address from worker email to user.
Login to Security Console and verify for couple of users from UI or you can verify from backend.
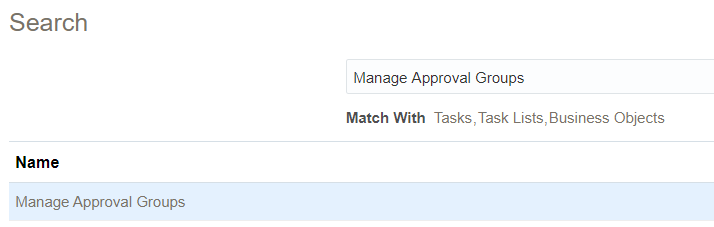
Disable the notifications (optional) – Navigate to Security Console -> User Categories -> Notification Preferences -> Uncheck the Enable Notifications:
4. Or you can redirect all the notification to single email address. Search for ‘Manage Approval Groups’ task in ‘Setup and Maintenance”:
Clicking on above task will take you to the BPM Worklist page.
Click on “Administration” button and search for Test Notification Email Address and provide the value where you want to redirect all your notifications:
If you want to completely purge the email data then use below post:
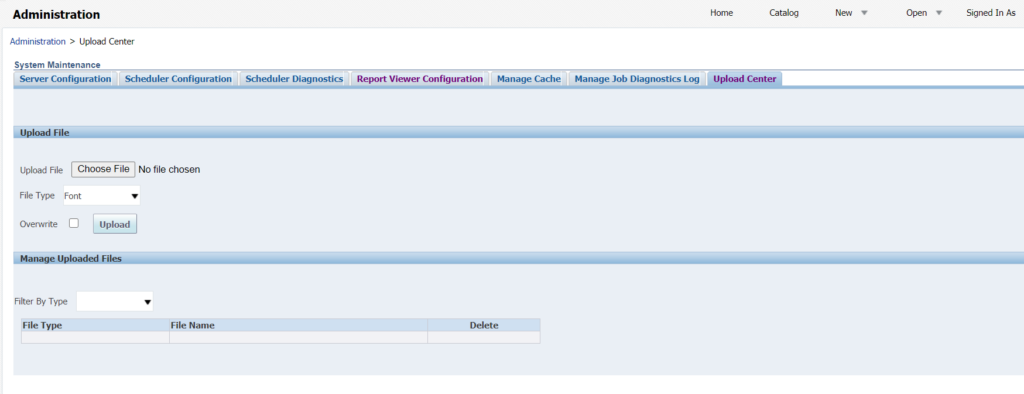
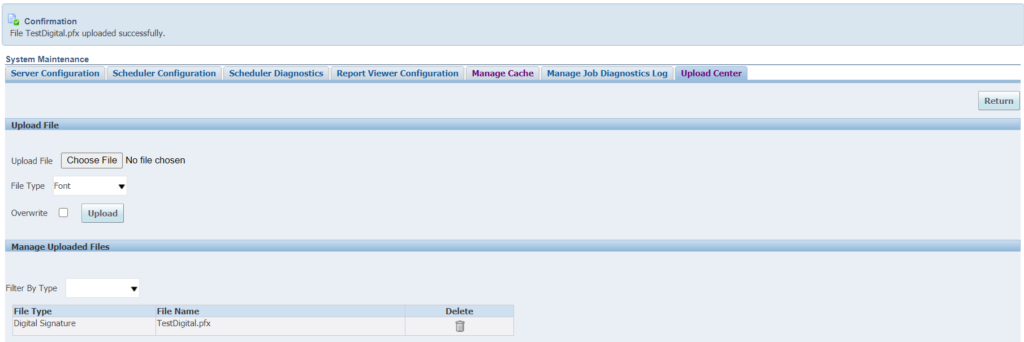
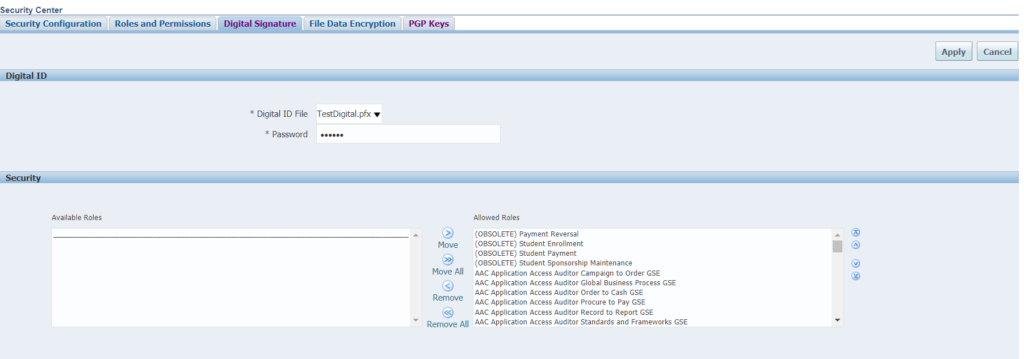
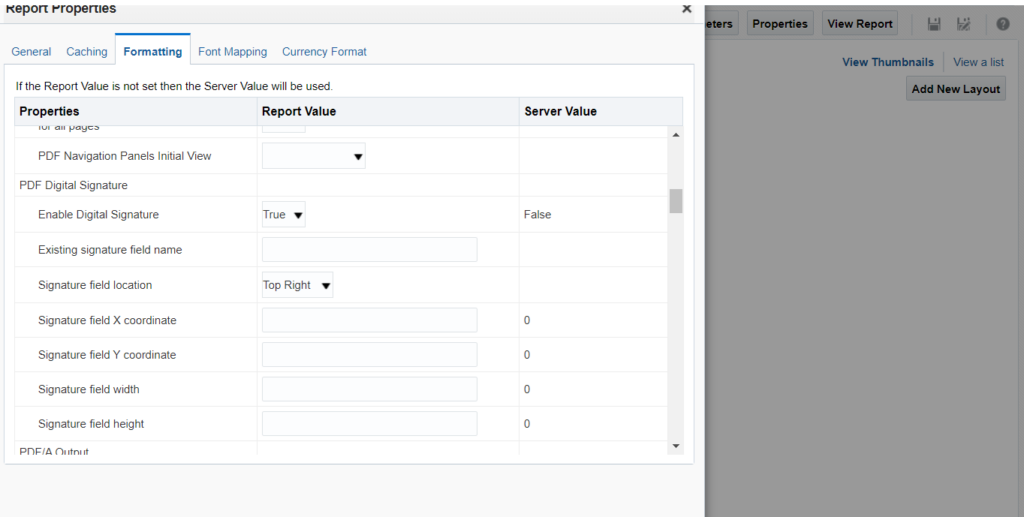
Many a times, consultants are required to modify the standard BIP reports. This is very much applicable in case of workflow notifications which are based on BIP reports. Both data model as well report can be customized to include/exclude any additional fields.
Sometimes it is required to delete the uploaded phones data from Fusion HCM. Below query can be used to create a BIP report which in turn can be used to generate HDL file to delete phones data.
The query can be modified to delete phones data for contacts as well as for other person types.
Supported Version :- 20D
Query:
SELECT 'METADATA|PersonPhone|PhoneId|PhoneType|PersonId|DateFrom|SourceSystemId|SourceSystemOwner' D_ROW
FROM DUAL
union
SELECT 'DELETE|PersonPhone|'||
       pp.phone_id||'|'||

       pp.phone_type||'|'||
       pp.person_id||'|'||
       to_char(pp.date_from,'RRRR/MM/DD')||'|'||
       hikm.source_system_id||'|'||
       hikm.source_system_owner
  from per_phones pp,
       hrc_integration_key_map hikm
 where pp.phone_id= hikm.surrogate_id
   and exists (select 1 from per_periods_of_service where person_id=pp.person_id)
In HR Helpdesk (HRHD), workers are assigned as resources. Below SQL query can be used to get the details of workers who are assigned as resources:
select hp.PERSON_FIRST_NAME "FirstName"
,hp.PERSON_LAST_NAME "LastName"
,hp.EMAIL_ADDRESS "ResourceEmail"
,hp.PARTY_NUMBER "ResourcePartyNumber"
,papf.person_number
from HZ_PARTIES hp,
per_all_people_f papf
where papf.person_id = hp.ORIG_SYSTEM_REFERENCE
and trunc(sysdate) between papf.effective_start_date and papf.effective_end_date
--and papf.person_number IN ('964091')
While creating an HCM extract based on a BIP report, there is a common requirement where the BIP should retrieve “Changed Only” data. This can be achieved using a BIP report data model which is based on globalReportsDataModel (/shared/Human Capital Management/Payroll/Data Model).
Use the below query in the data set to extract last run date of HCM extract and based on this date create a filter on last_update_date of the standard table from which we are extracting the data.
WITH pLastRunDate AS
(SELECT MAX(pfi.LAST_UPDATE_DATE) LAST_UPDATE_DATE
FROM pay_flows pf
,pay_flow_instances pfi
WHERE 1=1
AND pf.base_flow_id = pfi.base_flow_id
AND pfi.LAST_UPDATE_DATE < sysdate
AND pf.base_flow_name ='XX Custom Integration Extract' -- - give the name of your HCM extract
AND pfi.status = 'COMPLETED'
)