Oracle provides a process Purge Person Data in Test Environments to remove Person/Contact/Worker records from a test environment of Oracle HCM. Please note that HDL for core worker object doesn’t support DELETE, so there is no other option to purge the Person/Contact/Worker information from Oracle HCM once a record is created. In this case, Purge Person Data in Test Environments is definitely a useful utility which helps to purge person related data from a test environment.
This process can’t be run in Oracle HCM Production.
Before 21D, the process required an additional step to get a key to enable to process in Test environments but from 21D onwards the process is enabled by default in all test environments.
You can find more details related to this process on below link:
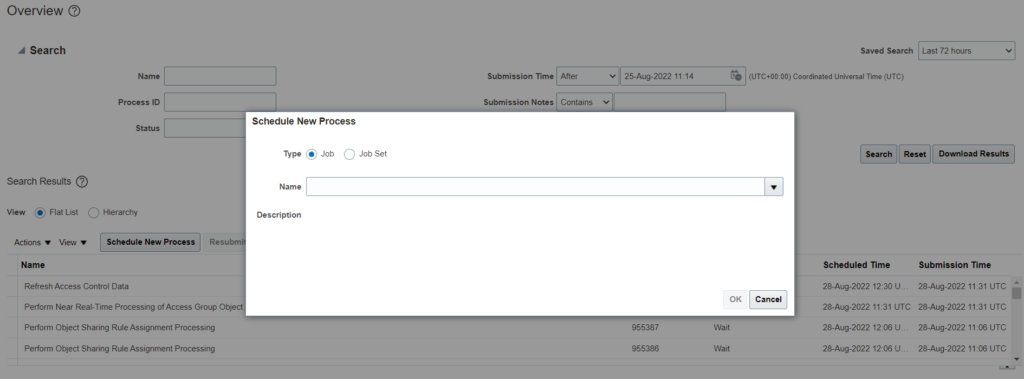
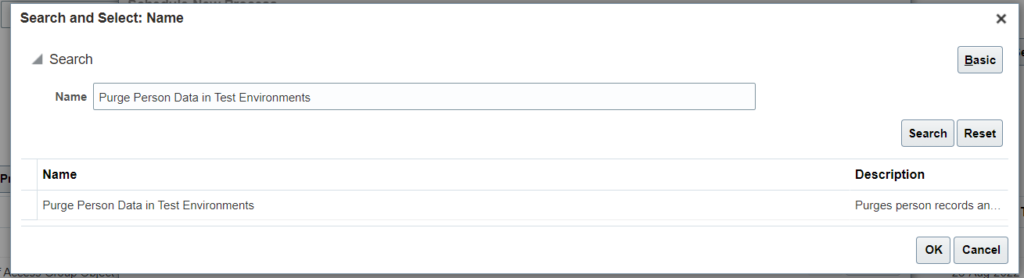
Click on schedule new process –> Search for Purge Person Data in Test Environments
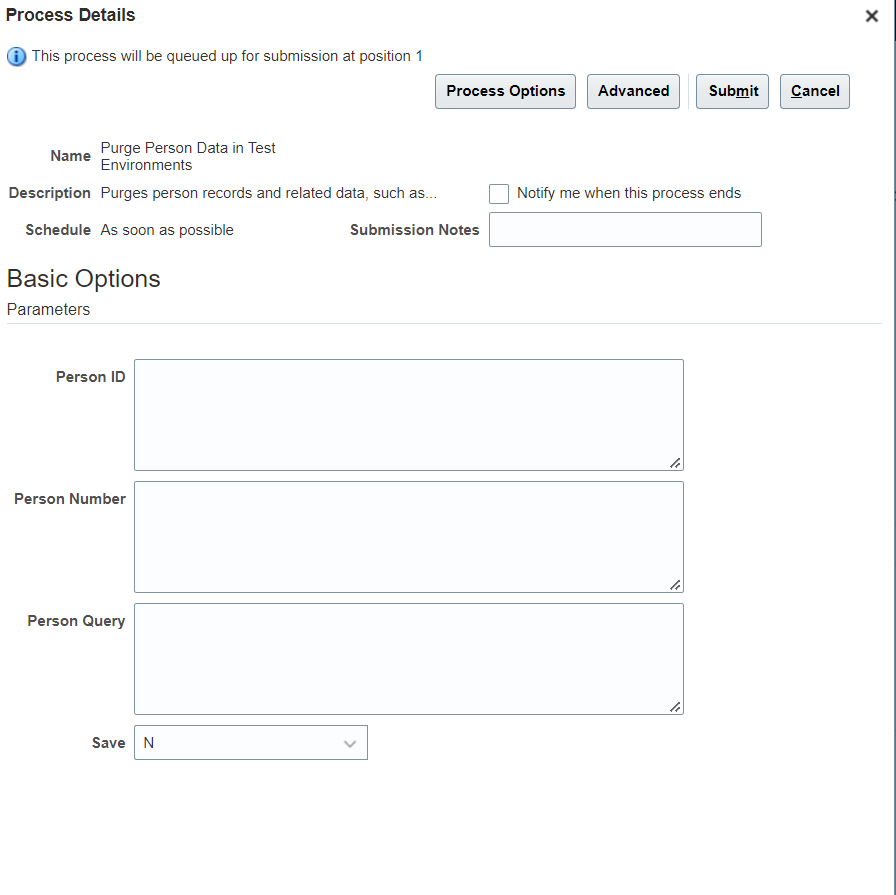
Supply the parameters
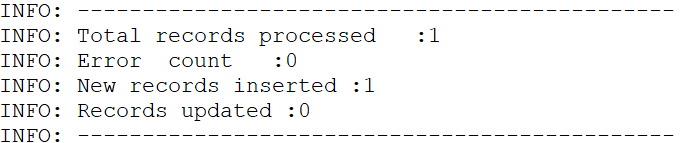
Make sure Save is set to Y to purge the records from DB.
Sample Person SQL’s:
To remove only Contact Person records:
SELECT DISTINCT papf.person_id FROM per_all_people_f papf WHERE 1=1 AND NOT EXISTS (SELECT 1 FROM per_periods_of_service ppos where ppos.person_id = papf.person_id)
To remove all person records:
SELECT DISTINCT papf.person_id FROM per_all_people_f papf
Use below SQL to monitor the progress of entries in each table:
SELECT a.*
FROM
(
SELECT 'ANC_PER_ABS_ENTRIES' table_name, count(*) rowcount FROM ANC_PER_ABS_ENTRIES
UNION
SELECT 'ANC_PER_ABS_ENTRY_DTLS' table_name, count(*) rowcount FROM ANC_PER_ABS_ENTRY_DTLS
UNION
SELECT 'ANC_PER_ABS_MATERNITY' table_name, count(*) rowcount FROM ANC_PER_ABS_MATERNITY
UNION
SELECT 'ANC_PER_PLAN_ENROLLMENT' table_name, count(*) rowcount FROM ANC_PER_PLAN_ENROLLMENT
UNION
SELECT 'ANC_PER_ABS_PLAN_ENTRIES' table_name, count(*) rowcount FROM ANC_PER_ABS_PLAN_ENTRIES
UNION
SELECT 'ANC_PER_ACCRUAL_ENTRIES' table_name, count(*) rowcount FROM ANC_PER_ACCRUAL_ENTRIES
UNION
SELECT 'ANC_PER_ACRL_ENTRY_DTLS' table_name, count(*) rowcount FROM ANC_PER_ACRL_ENTRY_DTLS
UNION
SELECT 'CMP_SALARY' table_name, count(*) rowcount FROM CMP_SALARY
UNION
SELECT 'PAY_ASSIGNED_PAYROLLS_DN' table_name, count(*) rowcount FROM PAY_ASSIGNED_PAYROLLS_DN
UNION
SELECT 'PAY_ASSIGNED_PAYROLLS_F' table_name, count(*) rowcount FROM PAY_ASSIGNED_PAYROLLS_F
UNION
SELECT 'PER_ADDRESSES_F' table_name, count(*) rowcount FROM PER_ADDRESSES_F
UNION
SELECT 'PER_ALL_ASSIGNMENTS_M' table_name, count(*) rowcount FROM PER_ALL_ASSIGNMENTS_M
UNION
SELECT 'PER_ALL_PEOPLE_F' table_name, count(*) rowcount FROM PER_ALL_PEOPLE_F
UNION
SELECT 'PER_ASSIGN_WORK_MEASURES_F' table_name, count(*) rowcount FROM PER_ASSIGN_WORK_MEASURES_F
UNION
SELECT 'PER_CITIZENSHIPS' table_name, count(*) rowcount FROM PER_CITIZENSHIPS
UNION
SELECT 'PER_DRIVERS_LICENSES' table_name, count(*) rowcount FROM PER_DRIVERS_LICENSES
UNION
SELECT 'PER_EMAIL_ADDRESSES' table_name, count(*) rowcount FROM PER_EMAIL_ADDRESSES
UNION
SELECT 'PER_ETHNICITIES' table_name, count(*) rowcount FROM PER_ETHNICITIES
UNION
SELECT 'PER_NATIONAL_IDENTIFIERS' table_name, count(*) rowcount FROM PER_NATIONAL_IDENTIFIERS
UNION
SELECT 'PER_PASSPORTS' table_name, count(*) rowcount FROM PER_PASSPORTS
UNION
SELECT 'PER_PEOPLE_LEGISLATIVE_F' table_name, count(*) rowcount FROM PER_PEOPLE_LEGISLATIVE_F
UNION
SELECT 'PER_PERIODS_OF_SERVICE' table_name, count(*) rowcount FROM PER_PERIODS_OF_SERVICE
UNION
SELECT 'PER_PERSON_ADDR_USAGES_F' table_name, count(*) rowcount FROM PER_PERSON_ADDR_USAGES_F
UNION
SELECT 'PER_PERSON_NAMES_F' table_name, count(*) rowcount FROM PER_PERSON_NAMES_F
UNION
SELECT 'PER_PERSON_TYPE_USAGES_M' table_name, count(*) rowcount FROM PER_PERSON_TYPE_USAGES_M
UNION
SELECT 'PER_PERSONS' table_name, count(*) rowcount FROM PER_PERSONS
UNION
SELECT 'PER_PHONES' table_name, count(*) rowcount FROM PER_PHONES
UNION
SELECT 'PER_RELIGIONS' table_name, count(*) rowcount FROM PER_RELIGIONS
UNION
SELECT 'PER_VISAS_PERMITS_F' table_name, count(*) rowcount FROM PER_VISAS_PERMITS_F
UNION
SELECT 'PAY_ELEMENT_ENTRIES_F' table_name, count(*) rowcount FROM PAY_ELEMENT_ENTRIES_F
UNION
SELECT 'PAY_ELEMENT_ENTRY_VALUES_F' table_name, count(*) rowcount FROM PAY_ELEMENT_ENTRY_VALUES_F
UNION
SELECT 'PER_WORKING_HOUR_PATTERNS_F' table_name, count(*) rowcount FROM PER_WORKING_HOUR_PATTERNS_F
UNION
SELECT 'PER_ASSIGNMENT_EXTRA_INFO_M' table_name, count(*) rowcount FROM PER_ASSIGNMENT_EXTRA_INFO_M
UNION
SELECT 'PER_ASSIGNMENT_SUPERVISORS_F' table_name, count(*) rowcount FROM PER_ASSIGNMENT_SUPERVISORS_F
UNION
SELECT 'PER_PEOPLE_EXTRA_INFO_F' table_name, count(*) rowcount FROM PER_PEOPLE_EXTRA_INFO_F
UNION
SELECT 'HR_DOCUMENTS_OF_RECORD ' table_name, count(*) rowcount FROM HR_DOCUMENTS_OF_RECORD
UNION
SELECT 'PER_CONTACT_RELATIONSHIPS ' table_name, count(*) rowcount FROM PER_CONTACT_RELATIONSHIPS
) a
where
a.rowcount <> 0
You can add/remove more tables based on data in your environment.
Stats:
Normally the process takes around 5-6 hrs for 16-17K employees. Performance depends upon environment sizing as well among other factors.
Use below query to extract disability org details from Fusion HCM:
SELECT houft.name disability_org_name
      ,TO_CHAR(haouf.effective_start_date,'RRRR/MM/DD') disability_org_start_date
      ,TO_CHAR(haouf.effective_end_date,'RRRR/MM/DD') disability_org_end_date
      ,houcf.classification_code
      ,haouf.internal_address_line
      ,houcf.status
  FROM hr_org_unit_classifications_f houcf
     , hr_all_organization_units_f haouf
     , hr_organization_units_f_tl houft
 WHERE houcf.organization_id = haouf.organization_id
   AND houft.organization_id = haouf.organization_id
   AND TRUNC(SYSDATE) BETWEEN houcf.effective_start_date AND houcf.effective_end_date
   AND TRUNC(SYSDATE) BETWEEN haouf.effective_start_date AND haouf.effective_end_date
   AND haouf.effective_start_date BETWEEN houft.effective_start_date AND houft.effective_end_date
   AND houft.language = USERENV('LANG')
   AND houcf.category_code = 'HCM_DISABILITY_ORGANIZATION'
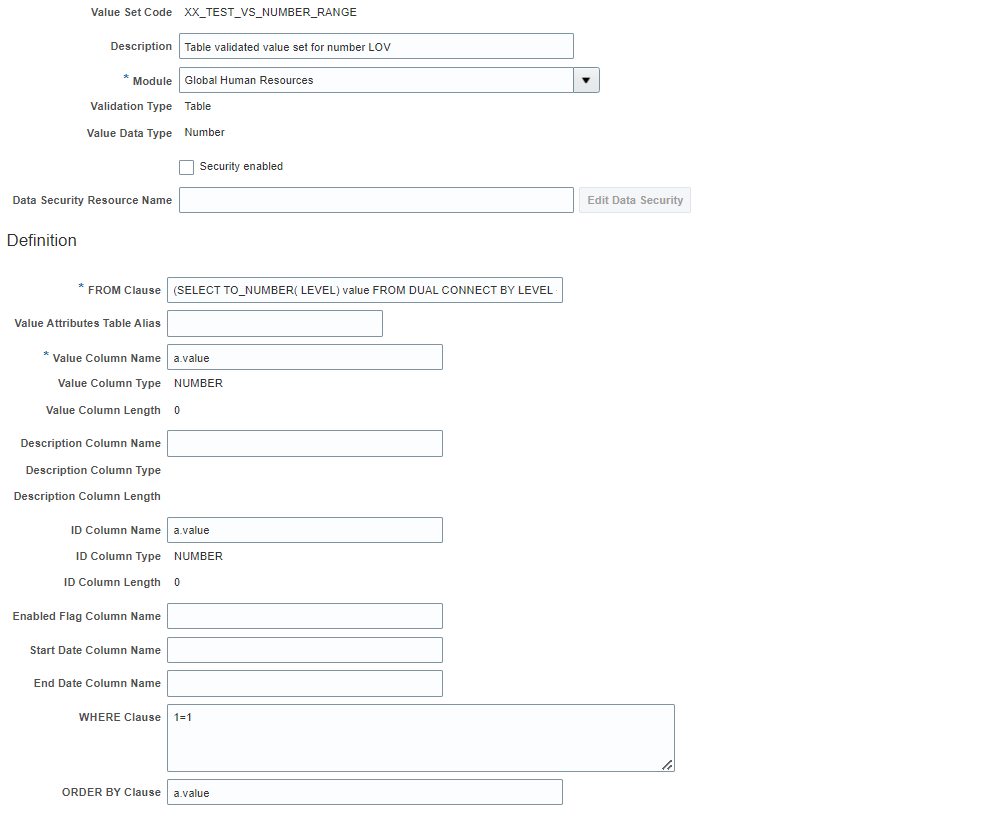
There is a common requirement to use value sets in various DFF attributes across Fusion HCM application. Oracle HCM supports different kind of value sets – Independent, Table validated etc.
There is a use case where a user wants to see a list of values containing numbers from 1 to n. There are two approaches to create a value set for this. Either you can define an Independent value set with 1 to n unique values or you can define a table validated value set.
Independent value set approach works fine if the value of n is small. But if the value of n is a large integer for example, n = 60, then it is not pragmatic to go ahead with a independent value set.
See the below example to define a table validated value set which will display values ranging from 1 to 60:
FROM Clause
(SELECT TO_NUMBER( LEVEL) value FROM DUAL CONNECT BY LEVEL <= 60) a
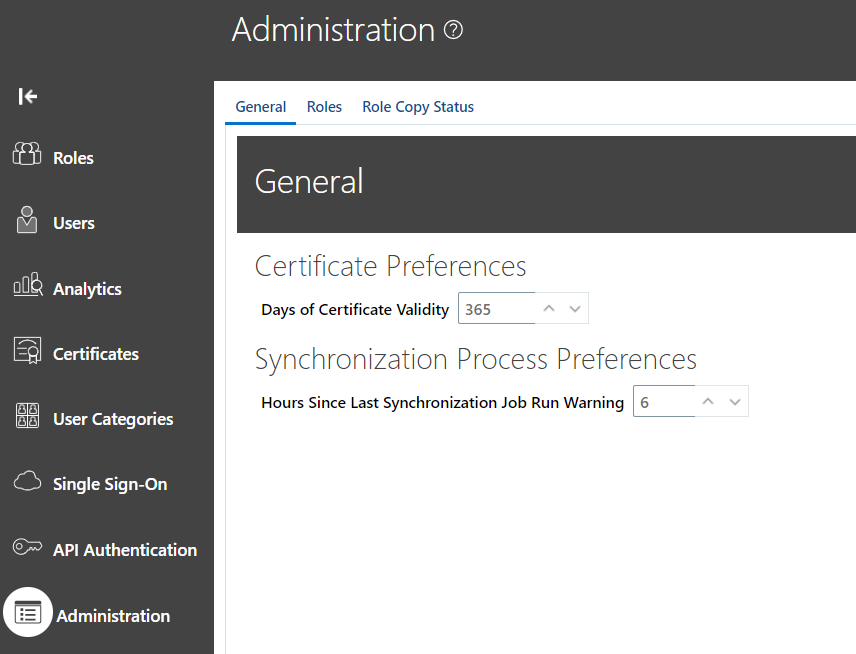
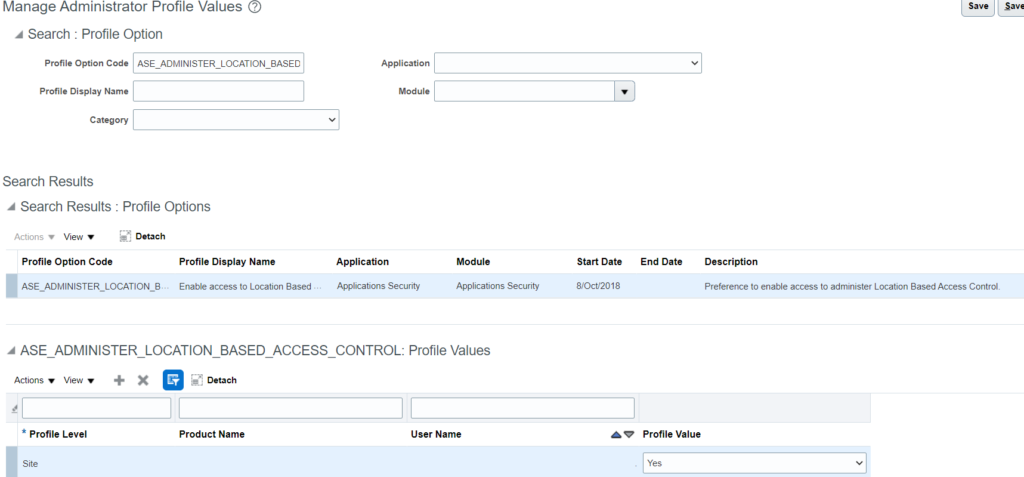
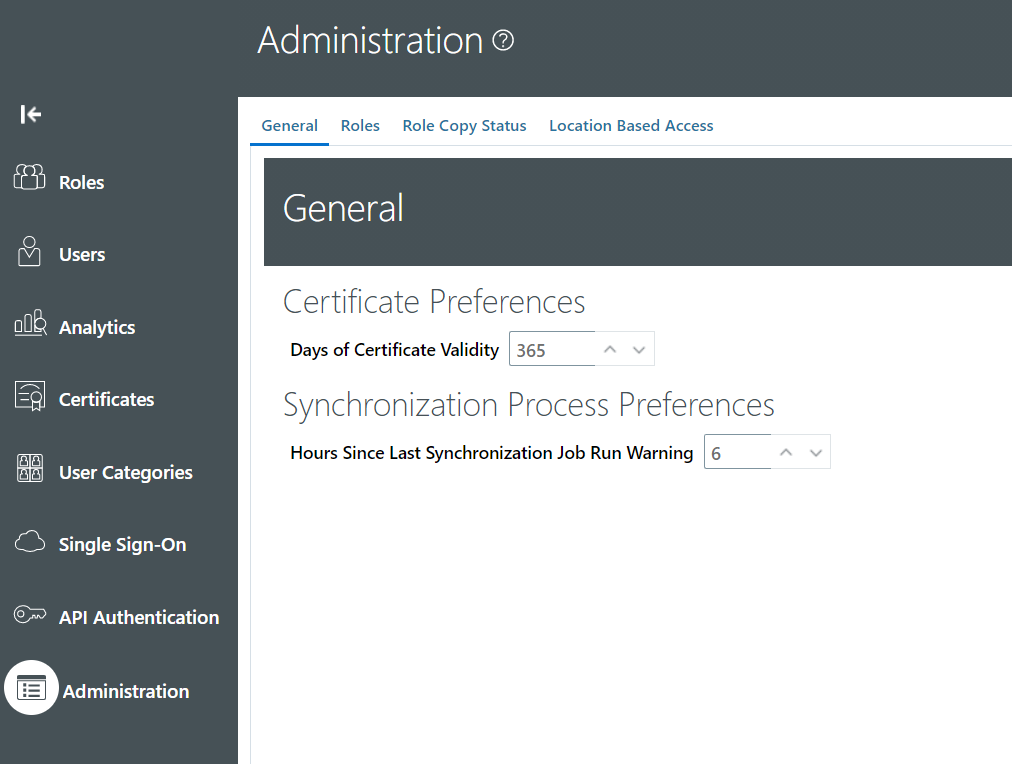
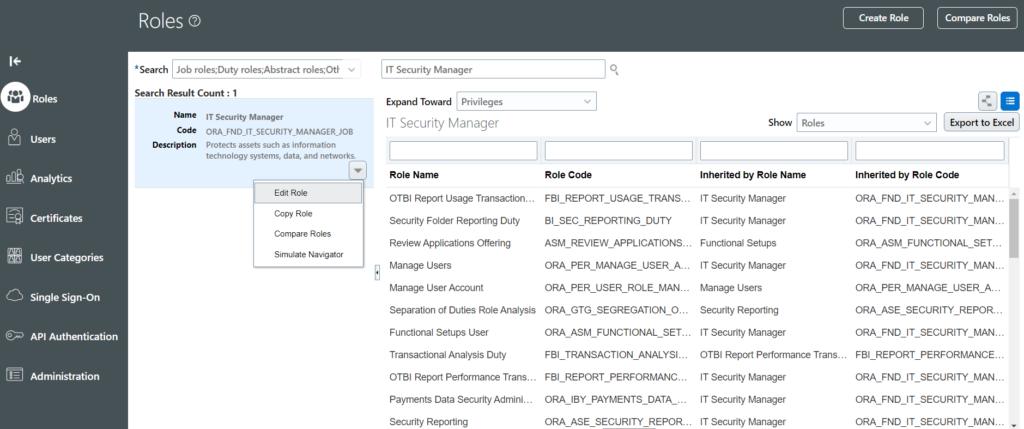
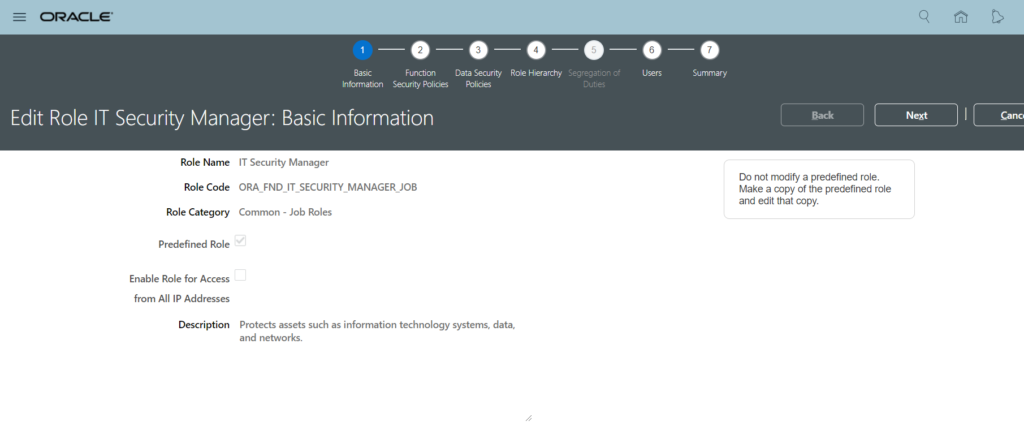
While implementing Location Based Access control for your application, make sure you set the IT Security Manager role as public. This will help you to access the application and the tasks in an event where a wrong list of IP’s has been supplied and no user is able to access the application.
Follow the below steps to make a role public:
Enable to location based access from Tools -> Administration and check the ‘Enable Location Based Access’ checkbox under Location Based Access tab.
2. After that, from the Tools -> Roles -> Search for IT Security Manager role and click on Edit Role:And check the ‘Enable Role for Access from All IP Addresses’ checkbox:Keep clicking on next button and submit the changes.
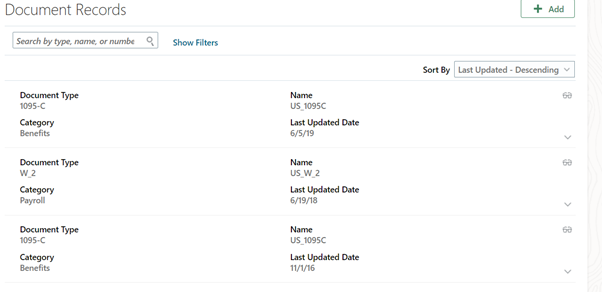
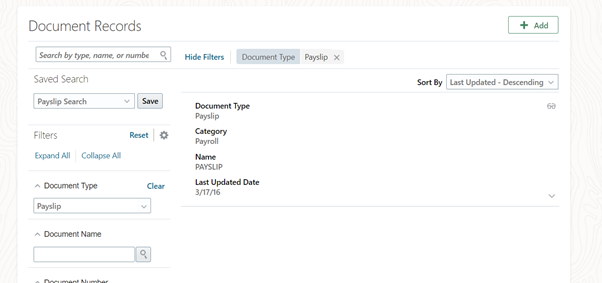
When an employee opens document of records, by default it will show all the document types. There are many scenarios where the business wants to set a default filter to see only a particular type of document type. The other document types should be visible only if the default filter is removed.
Follow the below steps to achieve this:
Create a sandbox and add Page composer tool.
Navigate to Me -> Personal Information -> Document of Record (or navigation at your pod):
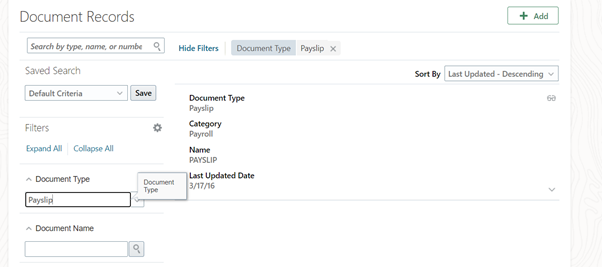
Click on show filters:
Enter Document Type as Payslip and click on Save button under Saved search:
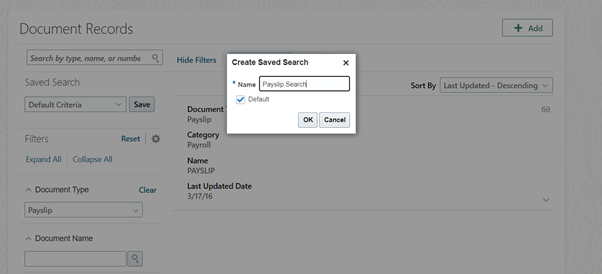
Give a name and click on Ok:
Test the changes by click on Home icon and navigating back to same place(document of record). The data should be displayed as per new search criteria.
SELECT csb.name
      ,csb.salary_basis_code
      ,csb.salary_annualization_factor
      ,pldgt.name legislative_dg
      ,petft.element_name
      ,pivt.name input_val_name
      ,prft.name rate_name
 FROM cmp_salary_bases csb
     ,per_legislative_data_groups_tl pldgt
     ,pay_element_types_tl petft
     ,pay_input_values_f pivf
     ,pay_input_values_tl pivt
     ,per_rates_f_tl prft
WHERE csb.legislative_data_group_id = pldgt.legislative_data_group_id
  AND pldgt.language = USERENV('LANG')
  AND csb.element_type_id = petft.element_type_id
  AND petft.language = USERENV('LANG')
  AND csb.element_type_id = pivf.element_type_id
  AND csb.input_value_id = pivf.input_value_id
  AND trunc(sysdate) between pivf.effective_start_date and pivf.effective_end_date
  AND pivf.input_value_id = pivt.input_value_id
  AND pivt.language = USERENV('LANG')
  AND csb.grade_rate_id = prft.rate_id(+)
  AND NVL(prft.language,USERENV('LANG')) = USERENV('LANG')
In this example, we will create a value set to display list of Grade steps based on Worker’s assigned grade. Create a Table validated value set using below:
pgftl.GRADE_STEP_ID=pgsf.GRADE_STEP_ID AND pgftl.language=’US’ AND trunc(sysdate) between trunc(pgftl.effective_start_date) and trunc(pgftl.effective_end_date) AND pgsf.GRADE_ID=pgf.GRADE_ID AND trunc(sysdate) between trunc(pgsf.effective_start_date) and trunc(pgsf.effective_end_date) AND trunc(sysdate) between trunc(pgf.effective_start_date) and trunc(pgf.effective_end_date) AND pgf.grade_id = :{PARAMETER.GRADE_ID}
Employee category (EMPLOYEE_CATG) is a delivered user type lookup in Oracle HCM which can be extended. However, in few cases, there is a requirement to populate employee category at DFF attribute(s), in this case, we need to create a table defined value set.
FROM Clause
fnd_lookup_values
Value Attributes Table Alias
*Value Column Name
substr(meaning,1,80)
Value Column Type
VARCHAR2
Value Column Length
80
Description Column Name
substr(meaning,1,100)
Description Column Type
VARCHAR2
Description Column Length
80
ID Column Name
substr(meaning,1,100)
ID Column Type
VARCHAR2
ID Column Length
80
Enabled Flag Column Name
Start Date Column Name
End Date Column Name
WHERE Clause
lookup_type= ‘EMPLOYEE_CATG’ and TAG is NULL and language = ‘US’ and enabled_flag = ‘Y’
While extending the DFF attributes for additional functionality, one of the common requirements is to get the list of workers in the system.
For this purpose a table based value set can be defined and attached to the DFF attribute.
FROM Clause
per_all_people_f papf, per_person_names_f ppnf
Value Attributes Table Alias
*Value Column Name
papf.person_number
Value Column Type
VARCHAR2
Value Column Length
30
Description Column Name
ppnf.full_name
Description Column Type
Description Column Length
ID Column Name
papf.person_number
ID Column Type
VARCHAR2
ID Column Length
30
Enabled Flag Column Name
Start Date Column Name
End Date Column Name
WHERE Clause
trunc(SYSDATE) between papf.effective_start_date AND papf.effective_end_date AND trunc(SYSDATE) between ppnf.effective_start_date AND ppnf.effective_end_date and ppnf.name_type = ‘GLOBAL’ and ppnf.person_id=papf.person_id and papf.person_id IN (select distinct person_id from per_periods_of_Service ppos where NVL(ppos.actual_termination_date, trunc(sysdate)) >= trunc(sysdate))
ORDER BY Clause
The above value set will show a list of only active employees. If you want to include inactive employees as well, please modify the where clause as below:
trunc(SYSDATE) between papf.effective_start_date AND papf.effective_end_date
AND trunc(SYSDATE) between ppnf.effective_start_date AND ppnf.effective_end_date
and ppnf.name_type = 'GLOBAL'
and ppnf.person_id=papf.person_id
and papf.person_id IN (select distinct person_id from per_periods_of_Service ppos)
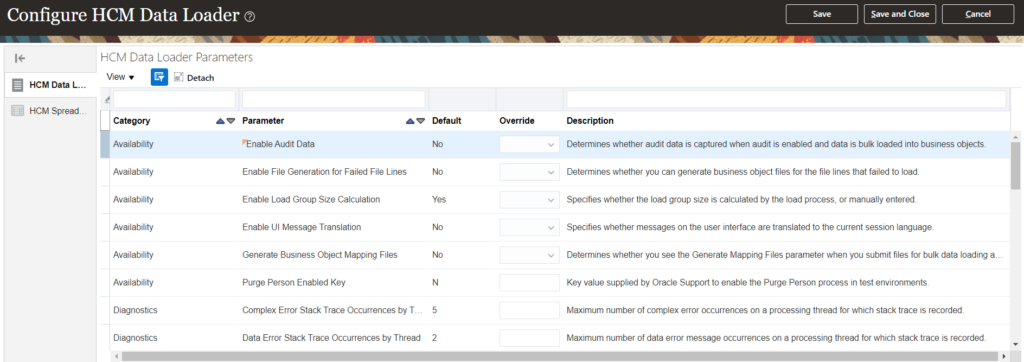
Configure HCM Data Loader is a task that is used to define the HCM Data Loader parameters. The parameters are broadly divided into following categories:- Availability, Diagnostic, File Definition, Performance and Scheduling Default. These are the default settings which are applied to any HCM Data Load.
You can override some of these parameters at the individual dat file level i.e. using SET commands or some of the parameters can be overridden while submitting the Import and Load job.
Please note that the default values vary from HDL to HSDL (Spreadsheet Loader).
You can use below mentioned query to get the details from backend using a BIP:
select PARAM_CATEGORY
          ,PARAM_NAME
	  ,DEFAULT_VALUE
	  ,HSDL_DEFAULT_VALUE
          ,HDL_ENABLED
	  ,HDL_OVERRIDE_ENABLED
	  ,HSDL_ENABLED
	  ,HSDL_OVERRIDE_ENABLED
	  ,VALUE_LOOKUP_TYPE
	  ,CREATED_BY
	  ,CREATION_DATE
	  ,LAST_UPDATED_BY
	  ,LAST_UPDATE_DATE
 from hrc_dl_all_parameters
 ORDER By 1,2
Query to get list of overridden values:
select hdap.PARAM_CATEGORY
      ,hdap.PARAM_NAME
	  ,hdap.DEFAULT_VALUE
	  ,hdap.HSDL_DEFAULT_VALUE
      ,hdap.HDL_ENABLED
	  ,hdap.HDL_OVERRIDE_ENABLED
	  ,hdap.HSDL_ENABLED
	  ,hdap.HSDL_OVERRIDE_ENABLED
	  ,hdap.VALUE_LOOKUP_TYPE
	  ,hdap.CREATED_BY
	  ,hdap.CREATION_DATE
	  ,hdap.LAST_UPDATED_BY
	  ,hdap.LAST_UPDATE_DATE
	  ,hdpo.OVERRIDE_LEVEL "OVERRIDDEN_AT_LEVEL"
	  ,hdpo.OVERRIDE_VALUE "OVERRIDDEN_VALUE"
 from hrc_dl_all_parameters hdap
     ,hrc_dl_parameter_overrides hdpo
where hdap.parameter_id = hdpo.parameter_id
 ORDER By 1,2
Lookups are commonly used across modules in SaaS. Sometimes, the number of lookups is so much that it takes lot of time and effort to create them manually in the application. Oracle SaaS supports bulk upload of both lookup types and lookup codes.
In this post, we will see how to make use of file based loader to load lookup types.
Prepare the lookup code file as given below:
LookupType|Meaning|Description|ModuleKey|ModuleType TXX_MASS_UPLOAD|Mass Upload Lookup Definition|Test Lookup created for demo purpose|HcmCommonHrCore|LBA TXX_MASS_UPLOAD_A|Mass Upload Lookup Def – A|Test Lookup created for demo purpose-A|HcmCommonHrCore|LBA
Out of above listed attributes, only the description is optional.
Module Key and module type both are required parameters. To know what value shall be passed, please check the below post:
While defining Common Lookups or value sets, you need to provide module value. Each module has an associated module type, module key and product code associated with it. For example:
These details are stored in backed in a table – FND_APPL_TAXONOMY.
Use the below query to find module type, module key etc for a module:
select fat.MODULE_NAME
,fat.MODULE_TYPE
,fat.MODULE_KEY
,fat.PRODUCT_CODE
from FND_APPL_TAXONOMY fat
Lookups are used commonly to meet different requirements. Many a times, lookup values easily go past hundred values, in such case adding the values one by one into the lookup is very tedious and error prone job.
There is no HDL support to bulk upload the lookup values. However, a file based solution is available which is easy to use and quick.
We have already discussed on how to bulk upload lookup types in below post:
Follow the below steps to mass upload lookup values:
Create a custom lookup from UI:
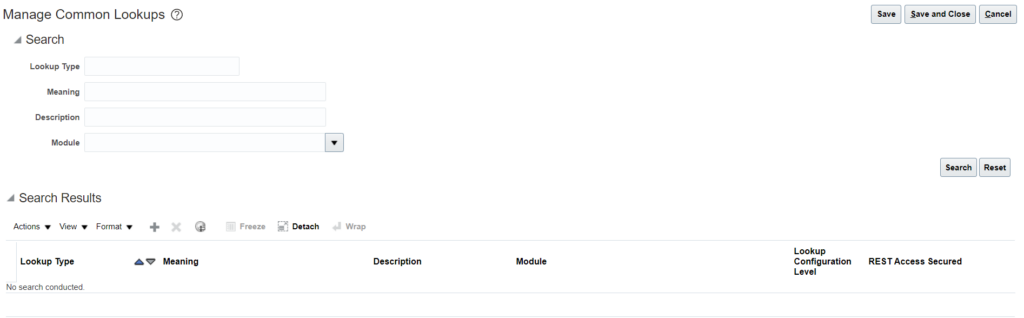
[N] – Setup and Maintenance -> Search -> Manage Common Lookups
2. Click on Add New (+) under search results:
3. Provide the details and Click on Save:
4. Prepare the lookup values file in below format:
LookupType|LookupCode|DisplaySequence|EnabledFlag|StartDateActive|EndDateActive|Meaning|Description|Tag XXX_MASS_UPLOAD|MASS_01|1|Y|15/12/2001||Mass Upload Value 1|Mass Upload Value 1 Description|+GB
Below mentioned attributes in the above file are Mandatory:
-> LookupType
-> LookupCode
-> EnabledFlag
-> Meaning
Except these all other fields are optional.
Date Format for StartDateActive and EndDateActive attributes is DD/M/RRRR.
File should be pipe (|) delimited.
Save the file as csv.
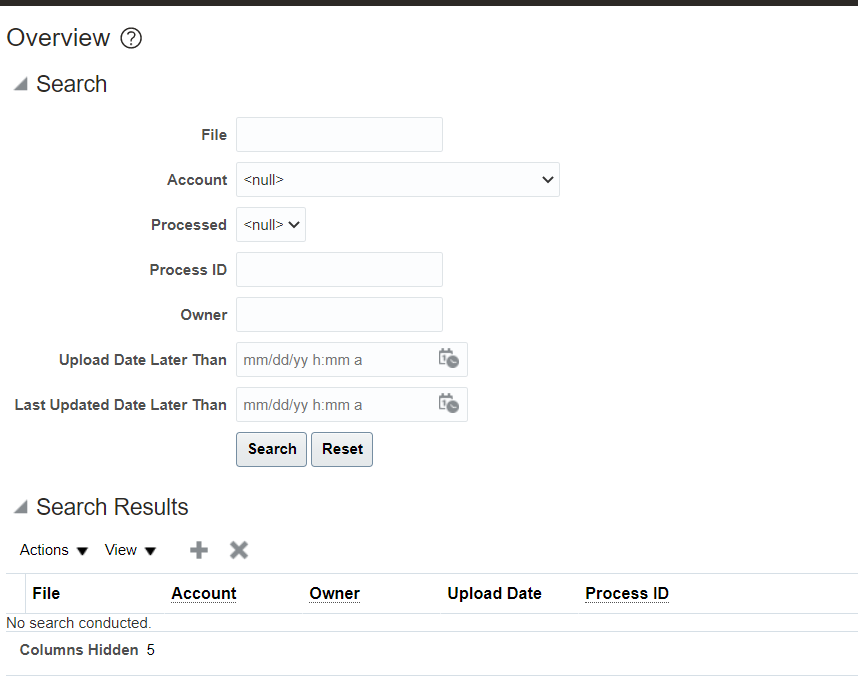
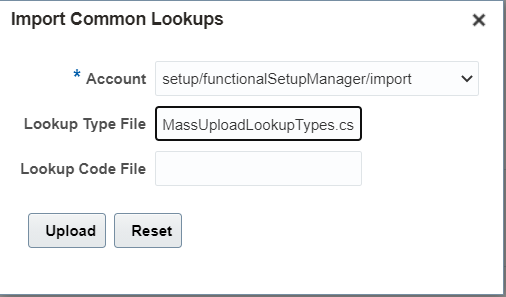
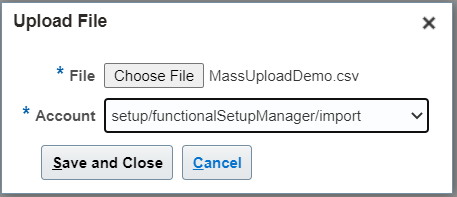
5. Once the file is ready, navigate to – Tools -> File Import and Export
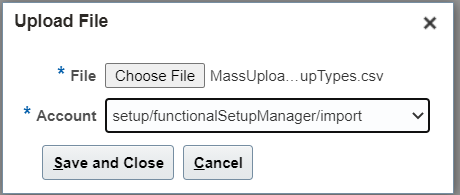
6. Click on Add (+) and choose your file:
Select account as :-> setup/functionalSetupManger/import
Click on Save and Close.
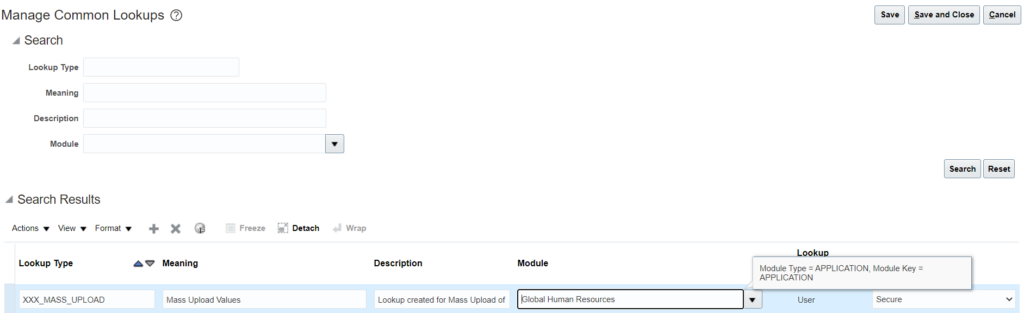
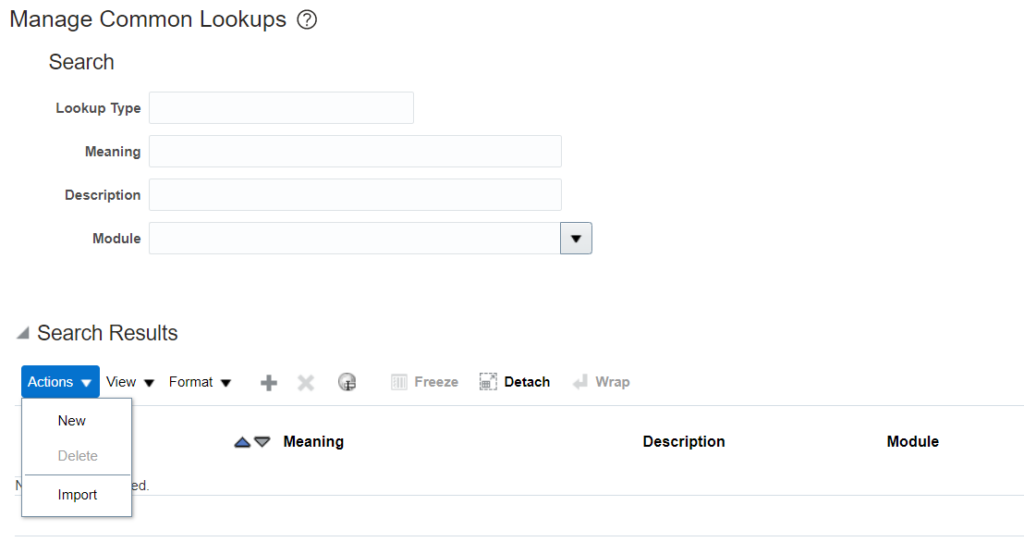
7. Navigate to Manage Common Lookups. Under Search Results click on Action and Import:
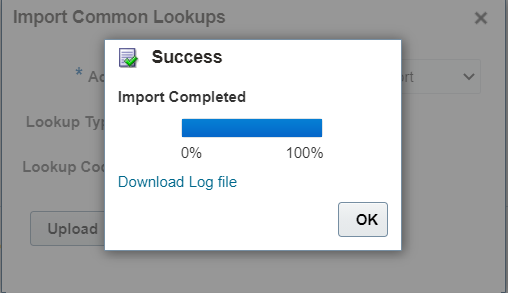
8. Select the account and give the file name as given in step 6 and Click on Upload button:
9. Monitor the import progress:
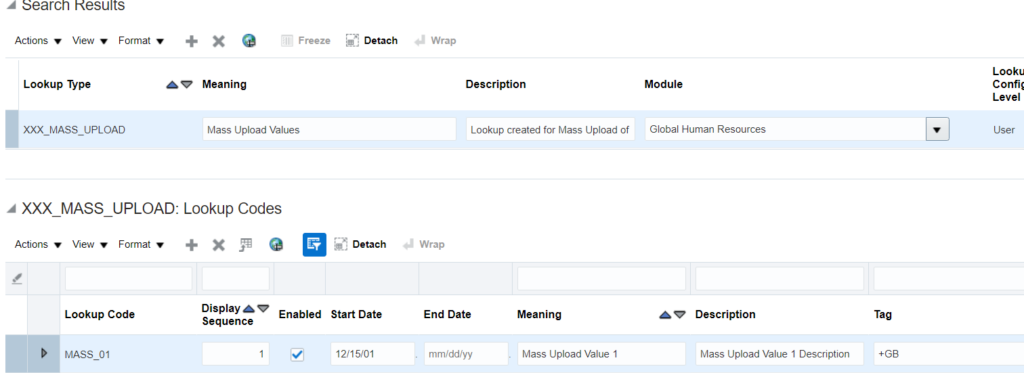
10. Once the import is complete, verify the uploaded values:
11. Results can be verified from Import file log as well:
Both Lookup types and lookup codes can be loaded in one shot as well. Prepare both the files simultaneously and follow the same steps as given above.
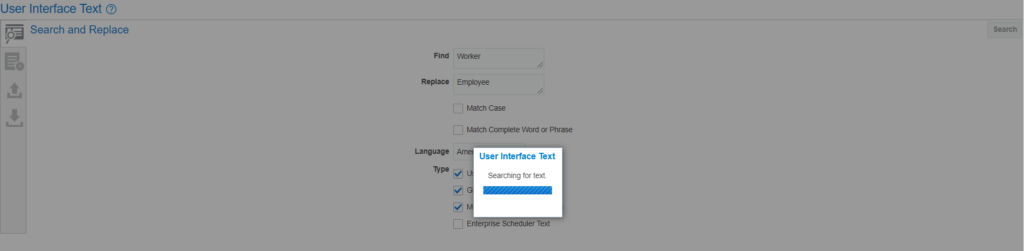
User Interface Text is a tool provided with Oracle Fusion Applications which can be used to replace any words/sentences across the application. For example, you want to rename Worker to Employee, then you can make use of this tool.
To make use of this tool, you have to first create a sandbox and then add User Interface Text tool in it. Then test your changes in sandbox mode. Once you are satisfied, you can publish your changes.
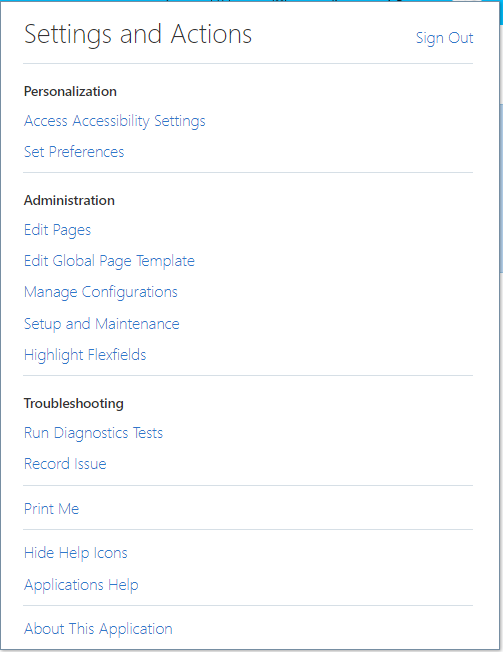
Navigate to User Name -> Settings and Actions -> Administration -> Edit Pages
Click on Activate Sandbox:
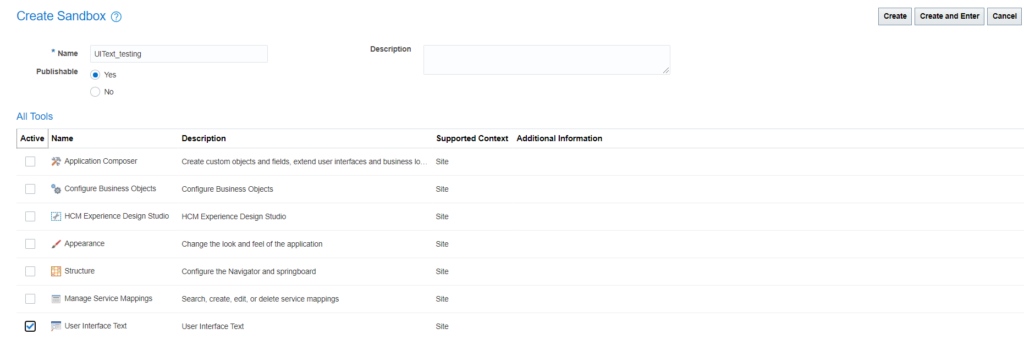
Click on ‘Create Sandbox’. Give a name and choose ‘User Interface Text’ tool:
Click on ‘Create and Enter’ button.
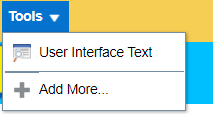
Click on User Interface Text:
In the Find text box give the string you want to search and in Replace text box give the text which you want to display and click on Search button:
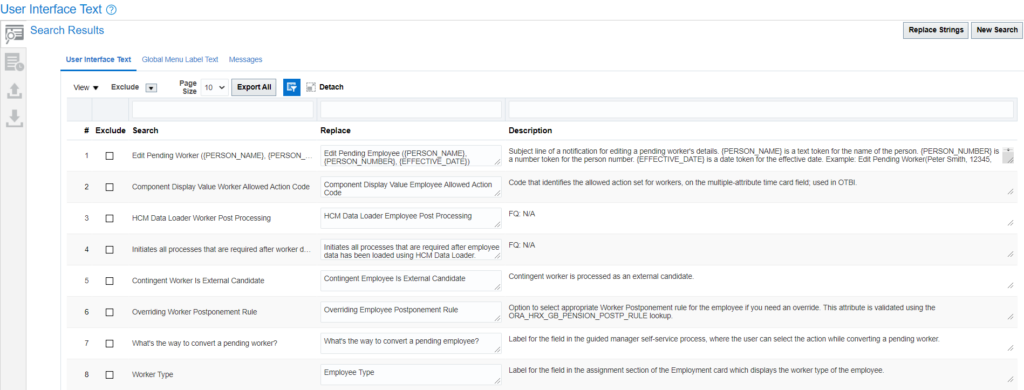
The result will show all the places where it finds the string:
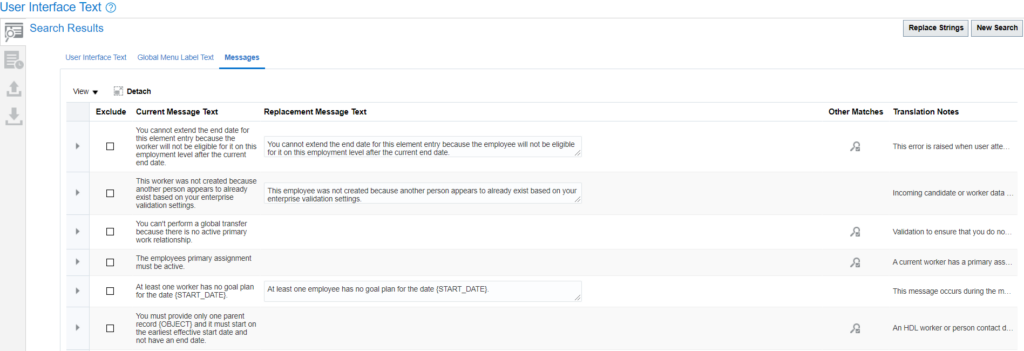
Check the other tabs as well for results to see the texts which will be replaced:
Click on ‘Replace Strings’ button if you want to proceed ahead with the changes or click on ‘New Search’ to start a new search:
Please note that initial search button will not get enabled unless you supply both (search and replace) values.
Manage Person Name Styles is a task that can be used to configure additional Name attributes for a country if required.
Also, a name component can be made required as per requirement.
In multi country implementations, it is required to know the setup for technical developers as it is hard to check the setup for each country from the UI. In such cases, below SQL can be used to extract the information from backend tables:
SELECT pnsv.legislation_code
      ,pensv.display_sequence
      ,pensv.column_name
      ,pensv.prompt
      ,pensv.required_flag
  FROM PER_EDIT_NAME_SETUP_VL pensv,
       PER_NAME_STYLES_VL pnsv
WHERE pensv.name_style_id = pnsv.name_style_id
ORDER BY 1,2